


mojo
-
Posts
204 -
Joined
-
Last visited
Content Type
Profiles
Forums
Store
Gallery
Events
Local Fish Stores
FAQ
Blogs
Downloads
Posts posted by mojo
-
-
I could have sold or given away many corals and a clam, but I didn't feel that would be ethical.
Lee, thanks for your comments and for emphasizing the troubles that accompany bryopsis. I do not, however, appreciate you insinuating that I'm doing something unethical by giving these things to other people. For everyone who has expressed interest, I have spoken at length with them to ensure that they fully understand both what bryopsis is, and the challenges associated with eradicating it. Many treatments have worked for tons of reefers out there, including lettuce nudibranchs, hyper-magnesium, and System ReefResh. I do not suggest that those strategies will work for everyone, only that options are available. I have provided full disclosure to everyone interested in taking these specimens, and they have expressed their full understanding of what they're getting themselves into. For them, the labor involved in removing the bryopsis, such as scraping the clam shells free of algae then prolonged close and careful observation, is worth it to them. Having said all of that, I feel that giving these specimens to others who are willing to fight it out is more ethical than smashing them with a sledgehammer or throwing them into the trash.
Lee, I'm sorry for your struggles with bryopsis (I battled it for 2 years before giving up) but I'm glad you ultimately won the fight.
Mike
p.s. All items have been claimed, thanks to everyone for your interest.
-
I encountered a little problem last night. It seems, I learned, that my 30g cube tank shares the same electrical circuit with this system. When I tested out the newly-hung lights, the chiller kicked in. No problem. But when the MJ 600 that feeds my ZEOvit reactor turned on (it's on a 3-hr on/3-hr off cycle) the circuit tripped. Unbelievable that I had been teetering on the edge, only to be pushed overboard by a little'ol Maxijet. At any rate, the tank tests 0 for ammonia and nitrate, and I've been circulating with cured LR and live sand for around 7 weeks already. Add that to 2 weeks of ZEOvit, and I felt the easiest solution to my electrical problem would be to shut down the 30g and transfer critters to the 203g.
I moved over a green-polyped ORA toadstool, a small frogspawn frag, a green/purple favites, some green/purple rics, a green plate coral, and a red open brain. My other corals and 2 clams have bryopsis on them, so they won't be transferring. I put a post on this site offering them up for free for anyone who wants them.
Next came the fish. I didn't want my clownfish pair to be test fish, but I was feeling confident and I went for it. I left the light off and they hid behind the 'scape. After a couple hours I turned the dusk/dawn lighting on, then went out for dinner. When I returned, they were hanging out together at the front of the tank over their host frogspawn frag, looking as happy as ever. The female ate readily, but the male did not. I'm sure he'll come around.
I also moved over some nassarius snails, but the astreas won't go. They all have bryopsis on their shells and they look like mini-Don Kings.
Currently I'm working through a problem with my OM 4-way. Previously I had the Barracuda CL pump dialed down a bit, and with the anticipation of adding corals I opened it up full bore. This caused some sand to fly, which resulted in a clicking sound from the 4-way. I figured some sand got in the drum, but when I tried to take it apart I couldn't get the drum out of the unit. I spoke with Paul on the phone (great guy) and he gave me some tips, but no success yet. I'll work through it again tomorrow at a better hour when I can call him again for more assistance.
-
The lights are a little tough to move up and down, harder than I expected, but not so hard that I want to add any more conspicuous hardware. The more I do it the easier it gets. You'll have to come over and check it out some time!
-
I'm moving over some of my livestock from my 30g cube to my new rimless aquarium. I say SOME, because I have corals and clams that have a little bit of bryopsis on them and I don't want to take any chance of contaminating my new tank. I don't want to kill them, so I'm offering them to anyone who wants them, for free. I have a tridacna gigas clam (very nice blue spots on mantle), a tridacna crocea clam (deep blue), pink zoanthids, and some frogspawn. If anyone wants them please send me a pm with your phone number and I'll give you a call.
Mike
-
Real good thoughts, James, but I wouldn't be able to get away with any extra hardware on the ceiling. Thanks for the ideas, though! If you've seen my recent update, you'll see that I'm actually fairly happy with the position of the light.
-
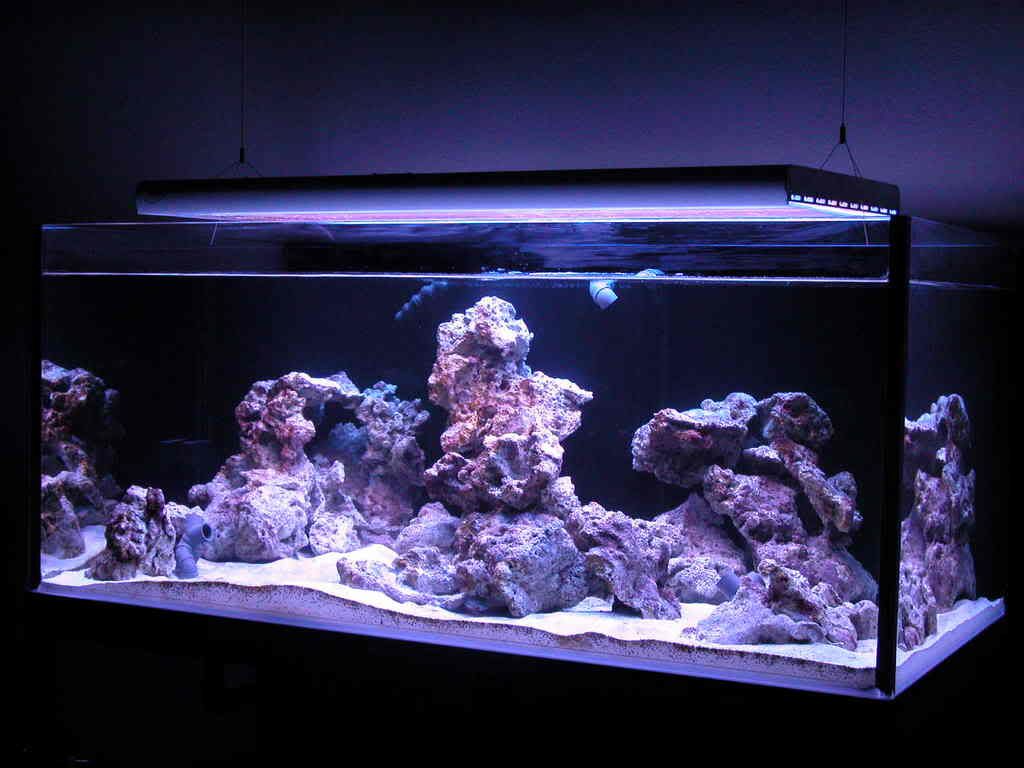
I finally hung the Powermodule!
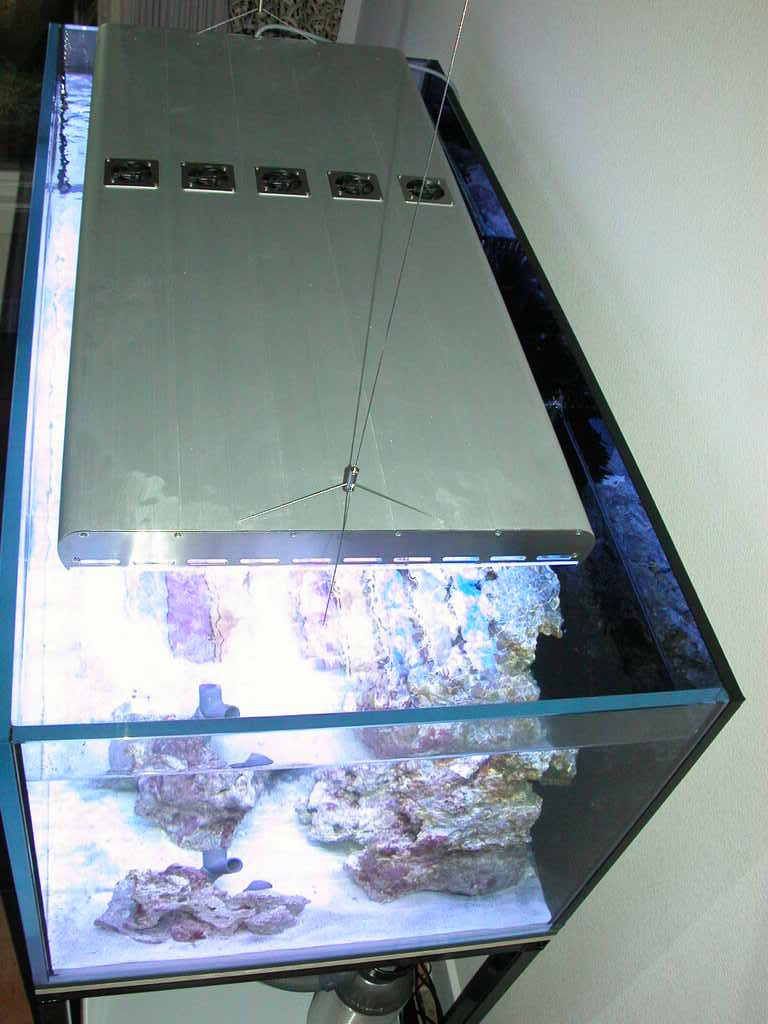
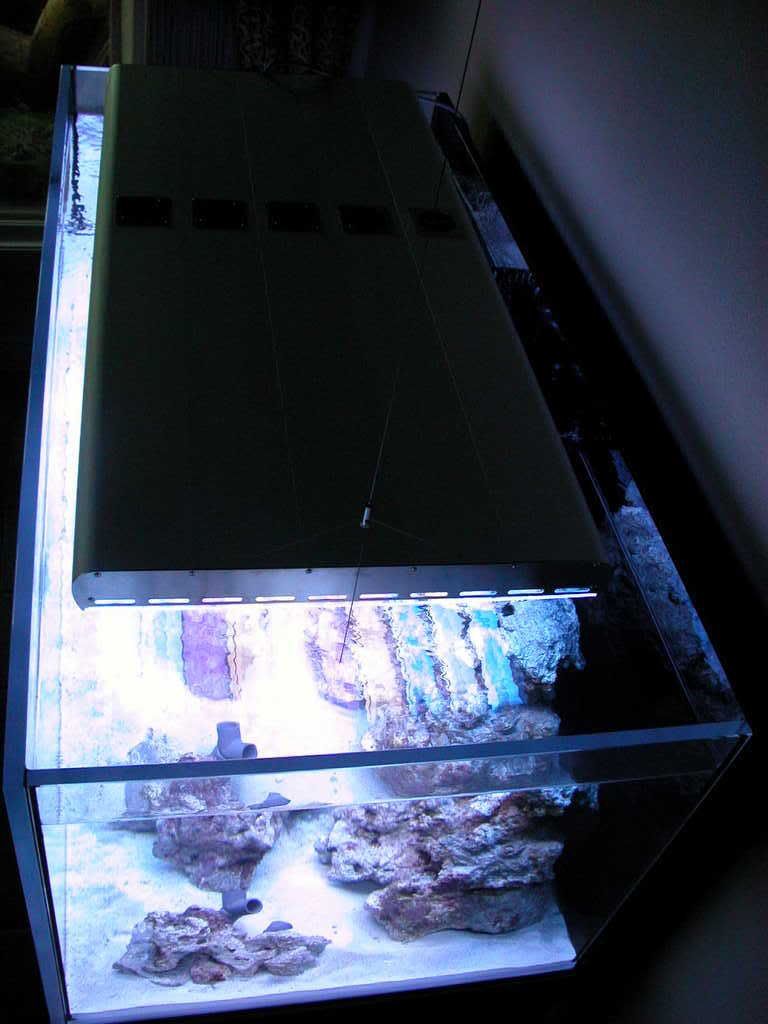
You can see that it's not exactly square over the tank, and it is quite a bit forward of center. I'm not happy with the fact that it's not square, but it's tough to see if you're not looking for it. I am happy with the fact that it's tweaked toward the front a little, as the light does not hang over the overflow box at all. This does mean that the rear of the tank is somewhat poorly illuminated, but I'll just keep corals there that require less light.
Here's how the tank looks. I think the light helps you to appreciate the depth of the aquascape much better in these photos than the ones I originally posted. Hope you like them!
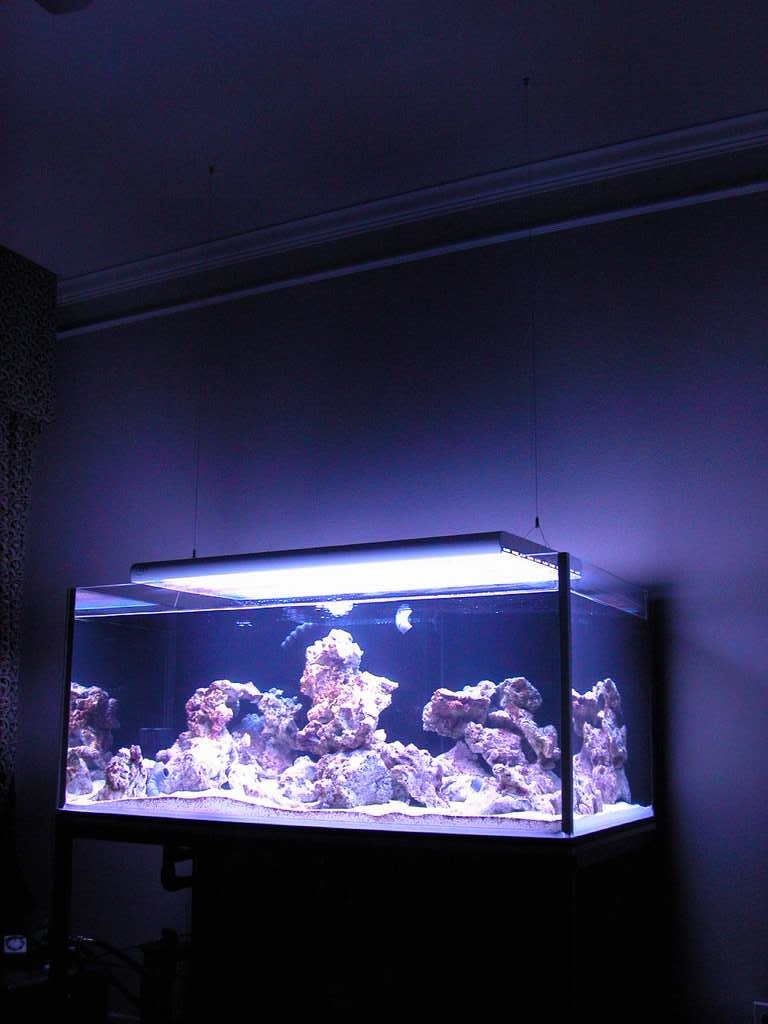
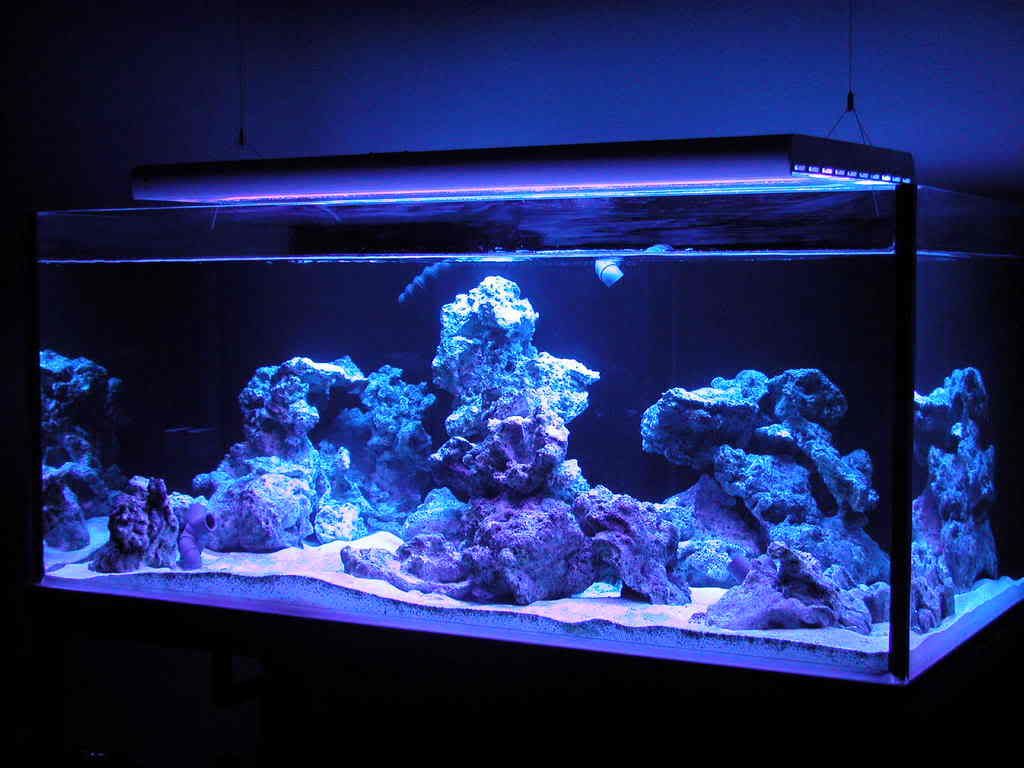
Same angle as above, but with dusk/dawn effect (super actinic in front, ATI blue plus in back)
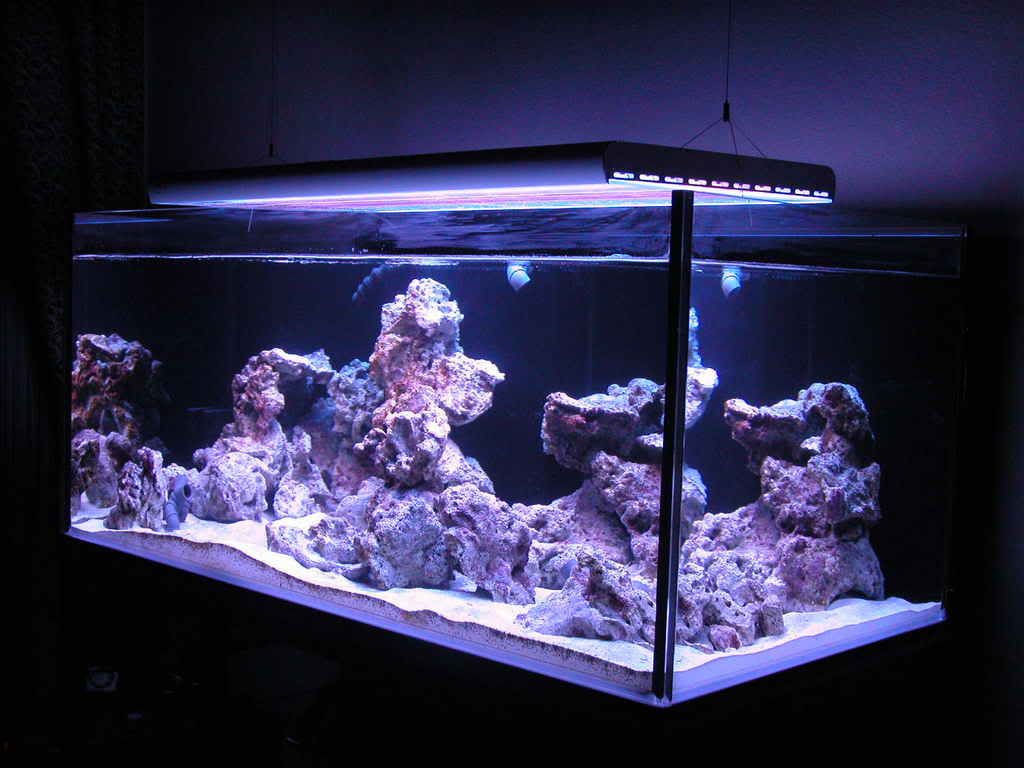
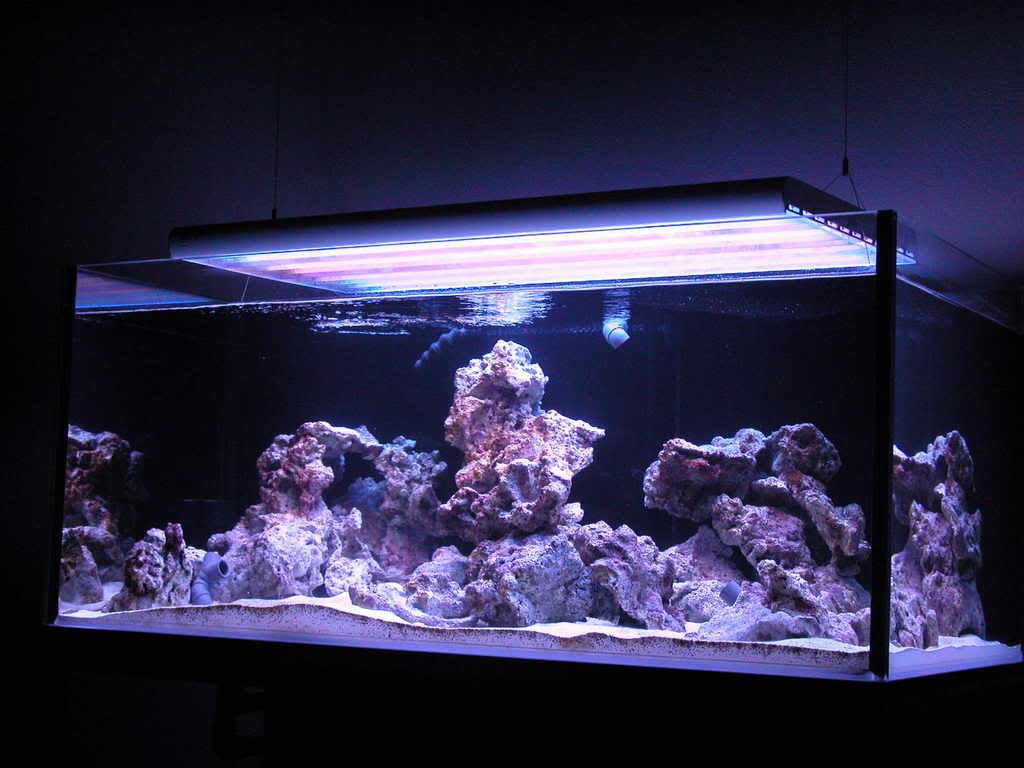
Here's the side view.
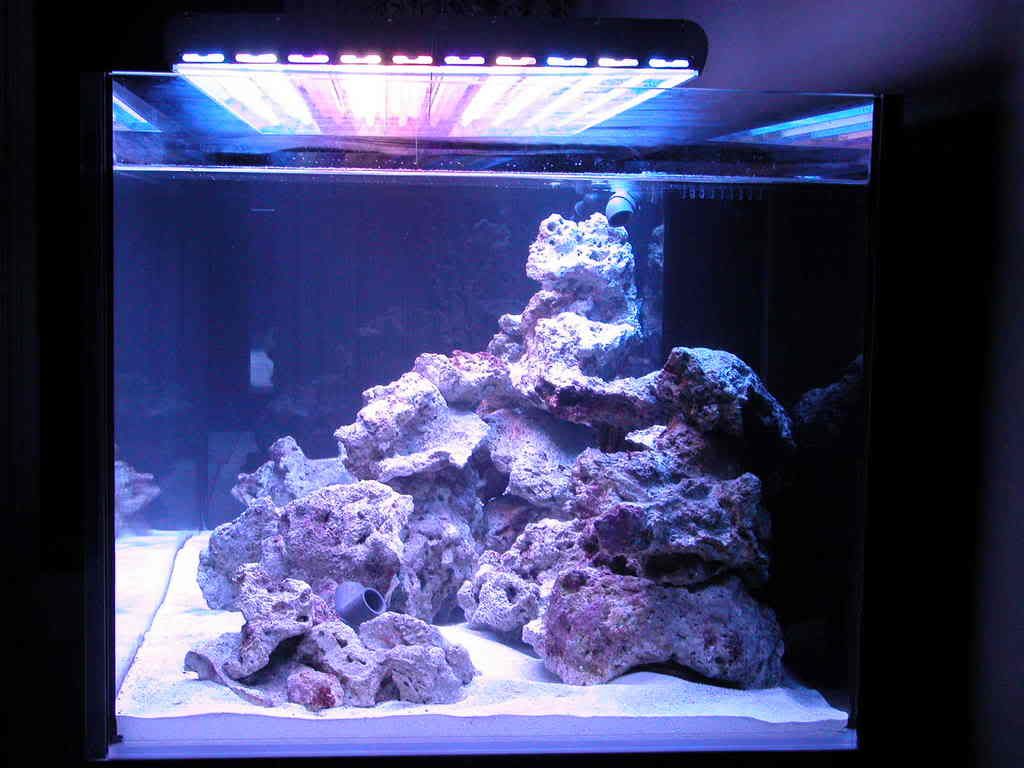
And the same view with the dusk/dawn configuration.

I hope everyone enjoys the pics.
-
Thanks for adding little'ol Austin to your web site Marc. We'll definitely have to do it again!
Mike
-
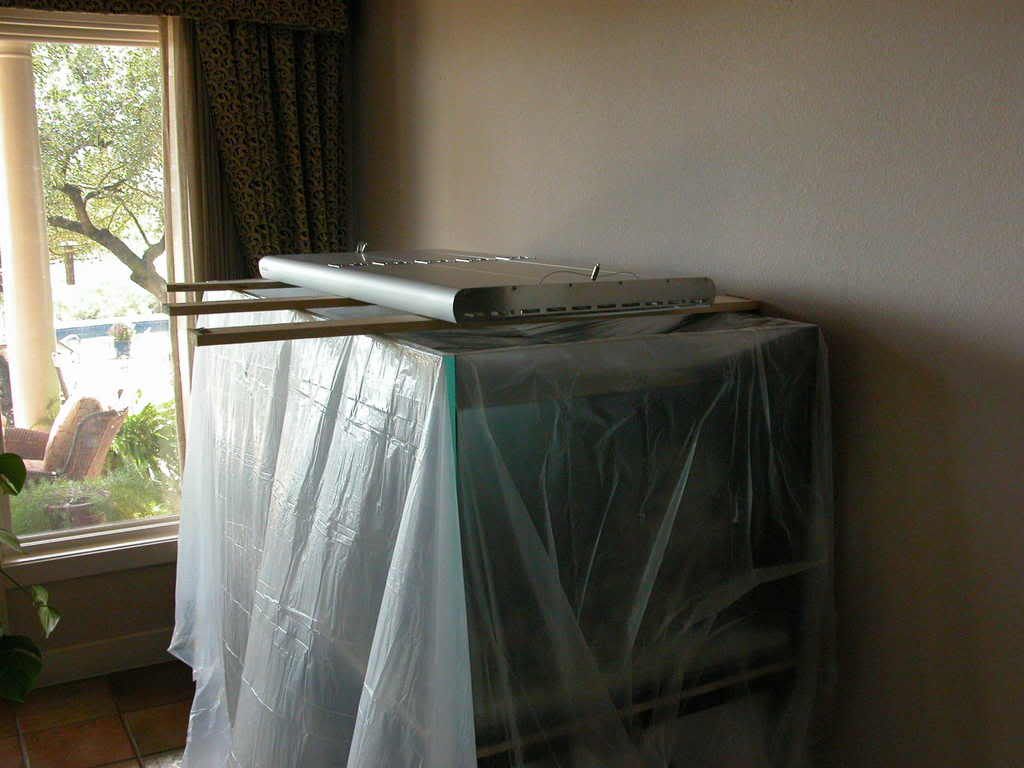
Now that you've seen the light, it was time to mount it to the ceiling over the tank. First I covered the tank with a tarp to protect it from drywall chips off the ceiling, and to keep the power cords out of the water (this actually came in handy). Next I laid some wood planks over the tank upon which to center the fixture.
Notice in this close up the ventilation slots on the side of the fixture to assist with cooling - nice!
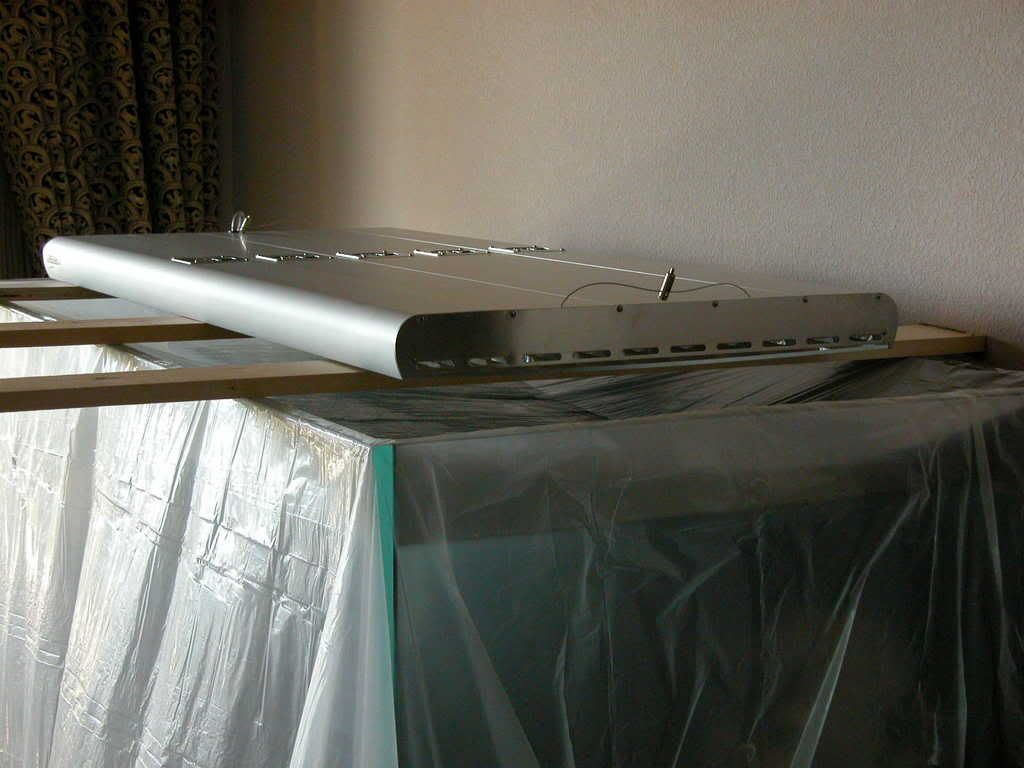
Once the unit was centered over the tank I used a plum bob to locate the spots on the ceiling that correspond to the place where the hanging wire joins the hardware on both sides of the fixture. The Powermodule comes with hardware for mounting to strong material, like wood, but unfortunately those places on my ceiling have no extra support other than the sheet rock material, and there's no attic above for me to install any extra support. I considered using toggle bolts but fortunately I found studs approximately 1 and 1/2 inches closer to the front of the marks. I stopped at that point to think it over, and I've finally decided that I'll mount the fixture about 2" front of center. Unfortunately, however, that will have to wait for a few days, as I'm leaving town tomorrow morning. When I return mid-week I'll have it hung and update everyone.
-
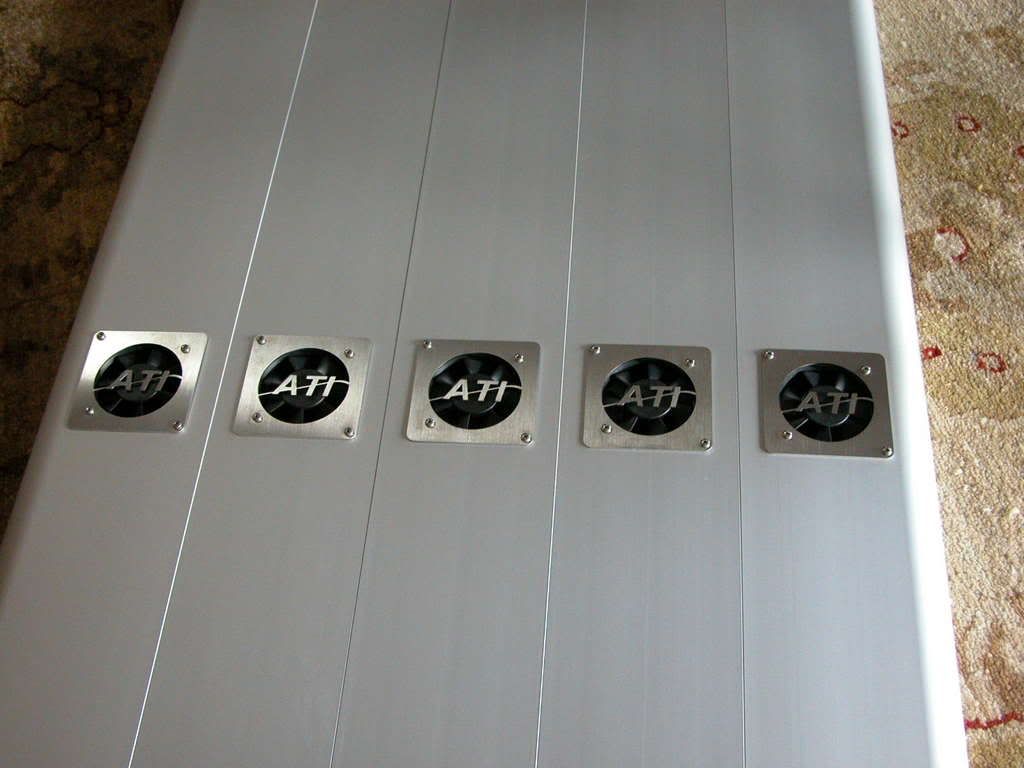
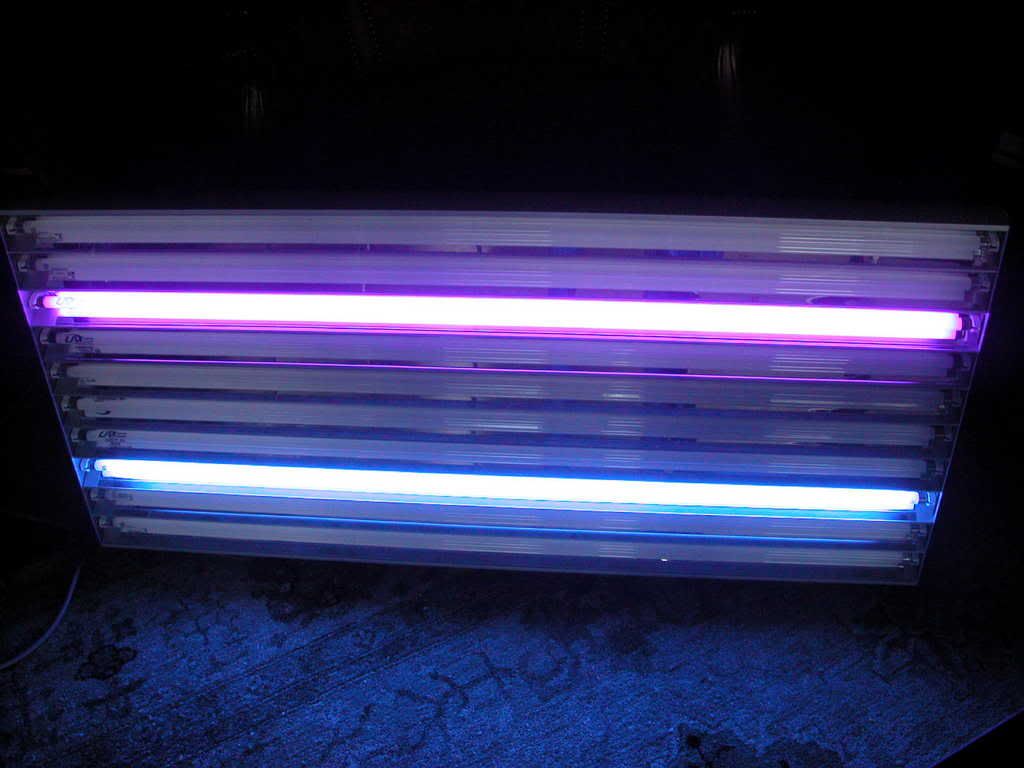
So I couldn't stand it having my new light in the closet, wondering how I was going to be able to mount it. With the help of other Powermodule owners I got the assistance I needed to get started, and I didn't need 2 other dudes, just my father in law, as it only weighs in the neighborhood of 50 pounds. Here it is, in all it's glory. It's a 10-lamp x 54 watt unit, measuring approximately 46" x 22" x 2.5". On the far left of the 1st image is the gray power supply. This splits farther out to 2 separate power cords, which I'll explain more about later.
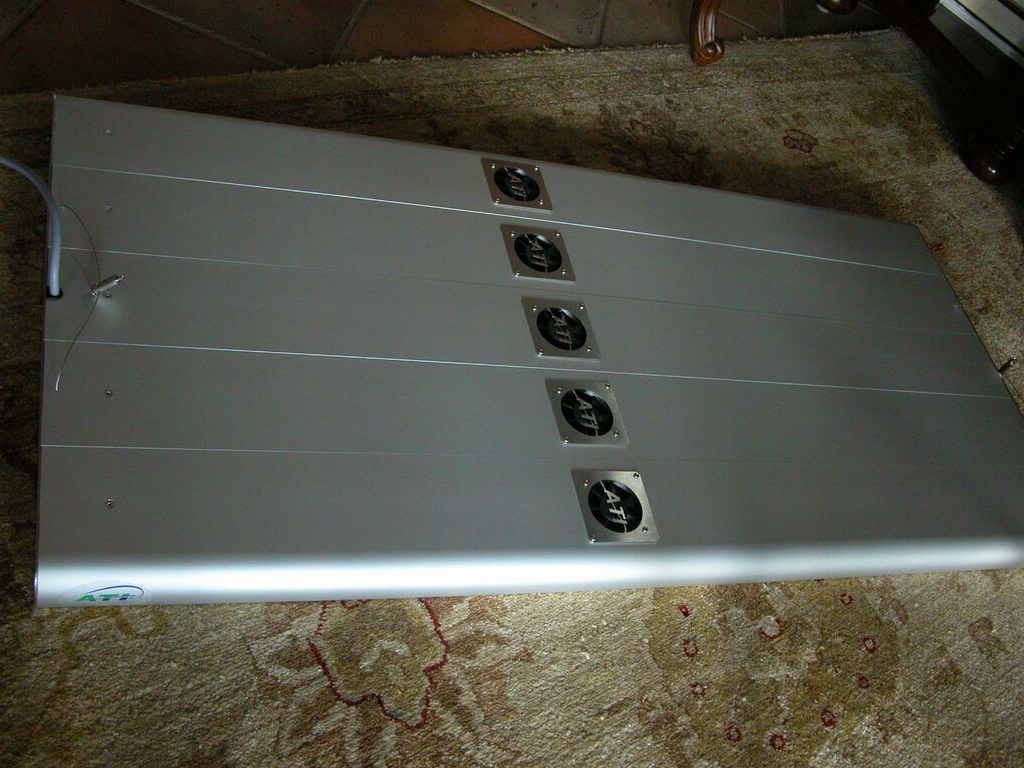
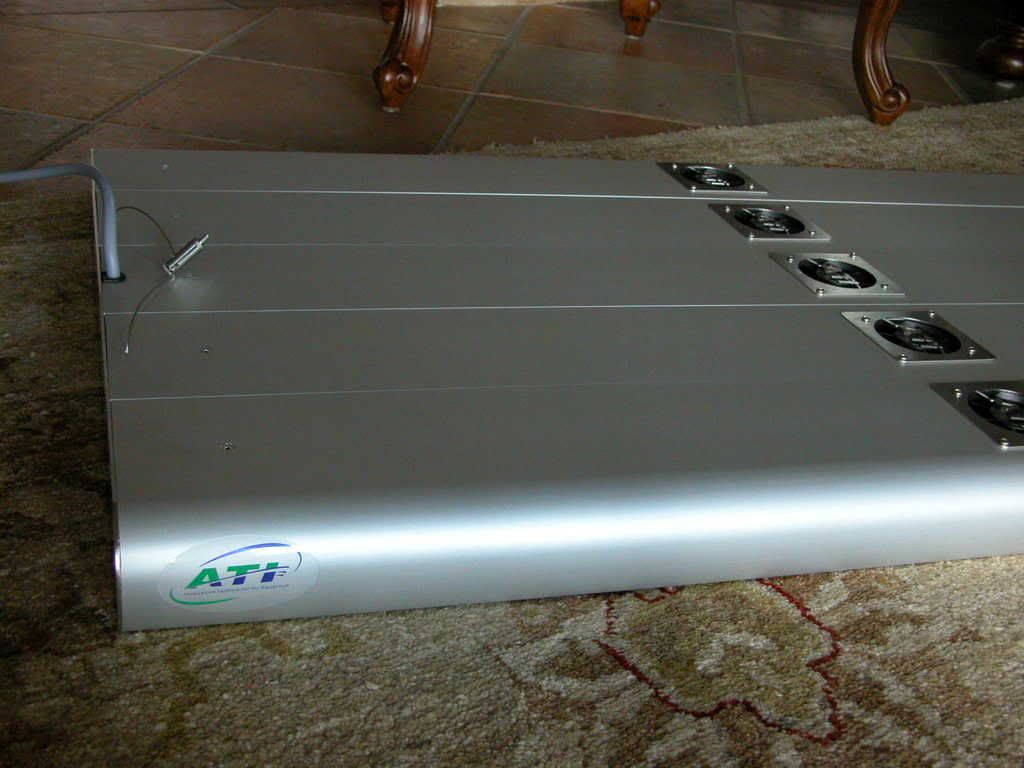
Here are the fans, each cooling 2 lamps.
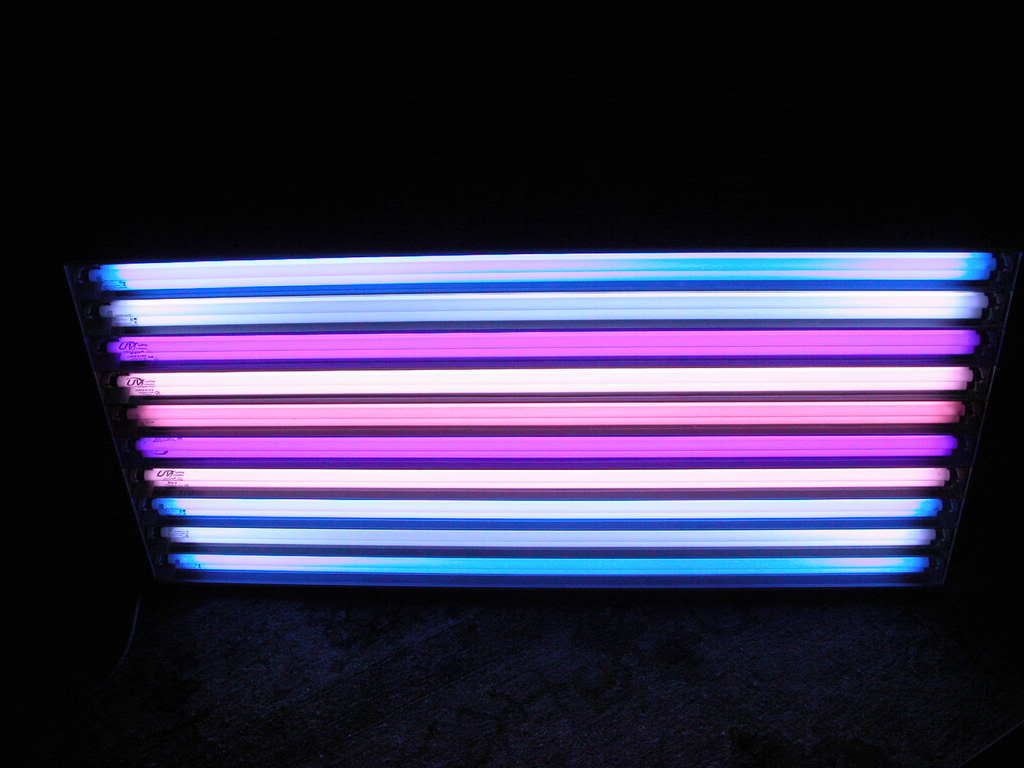
For my lamp selection, I went with 90% of the recommendation made by The Grim Reefer on Reef Central, a well-established guru of T5 lighting. I wanted to add a lamp that would bring out a little more of the reds, so I substituted a super actinic for an ATI Pro Color. Here is the fixture with all lamps aglow.
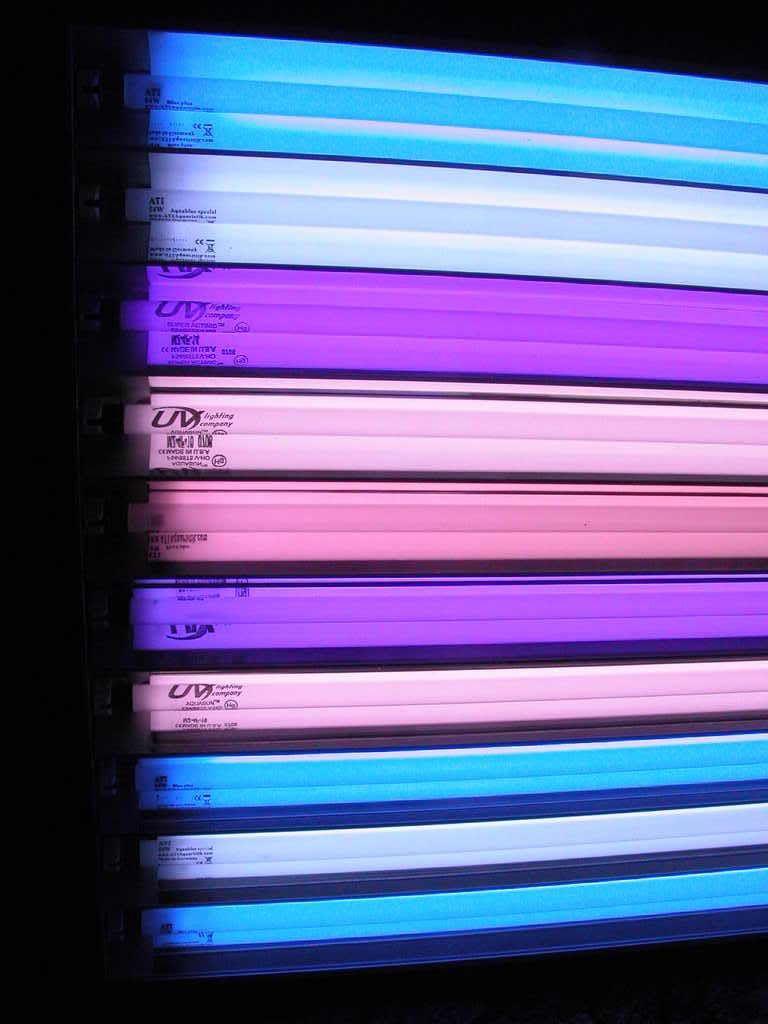
The lamps are situated as follows:
front
Blue plus
Aquablue
Super actinic
Aquasun
ProColor
Super actinic
Aquasun
Blue plus
Aquablue
Blue plus
rear
Notice how shiny the reflectors are? You can read the lamp names very clearly, and there's an acrylic shield covering the entire fixture that slides out quite easily.
Positions 3 and 8 are on a separate power cord from the other lamps, and these will be used for dusk/dawn. I originally had both of these as super actinics, but Grim suggested I include a blue plus in the mix, as it's supposed to look great combined with an actinic.
Here are the 2 super actinics.
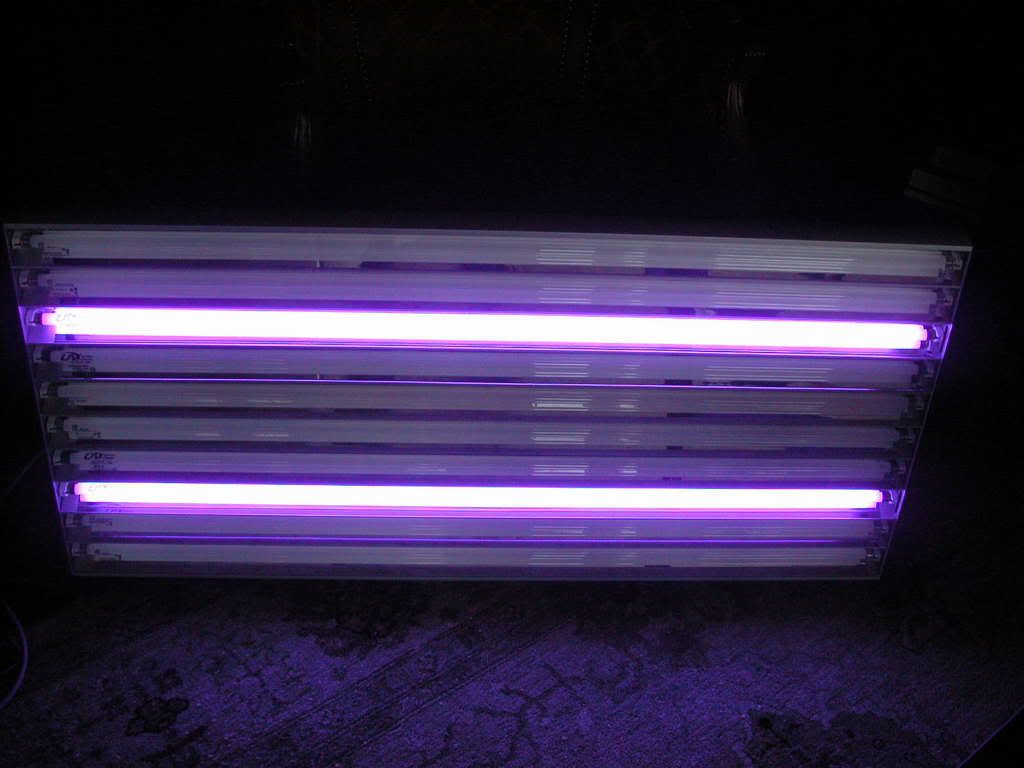
And here's how it looks with a super actinic and a blue plus.
-
Thanks! I might take you up on that.
-
I'm using a K-Z potassium kit. It needs to be done in very bright light, so it's only valuable if I test during the day since the color chart is very difficult to interperet.
You can begin using ZEOvit with an established tank, no problem. If you're truly interested, go to the forum and post your tank specs, and they'll walk you through it every step of the way. I can give you more specific direction if you're interested.
My office tank has 13 new corals that we picked up from 'the farm.' They're all doing sensationally well, thanks for asking.
By the way, I got my Powermodule! It'll probably be another week until I get it mounted, since I'll need the help of at least 2 other guys and I'll be out of town from Sunday until Wednesday afternoon. The mounting hardware has a slide that looks pretty easy to use, so I don't think I'll need to get the pulley system you're using, James.
-
Here's to let you know that already I believe in this stuff. I've been using the basics (carbon, ZEOliths, ZEObak and ZEOstart) for 6 days now and already the water is clearer! The tank has always looked clear to my eye, but when gazing from the side with the sun shining through the window on the other side of the tank, I've always seen a faint haze in the water column. After only 4 days of this method that haze has completely resolved and the water is truly crystal clear. I'm so hooked and I don't even have any corals in the tank yet.
In other news I tested my potassium (K+) and it was 330. It needs to be raised to around 390, which is considered important for the method for coral growth and coloration, so I'll need to get the supplement eventually.
-
Don't hold back James, tell me what you really think
 .
. -
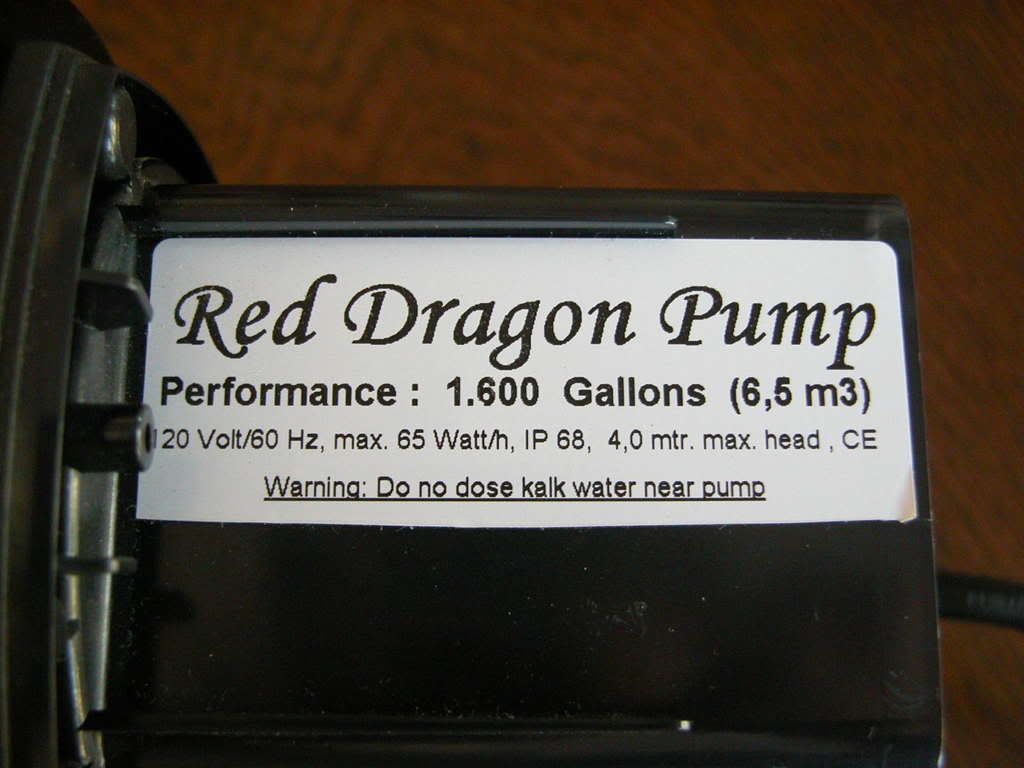
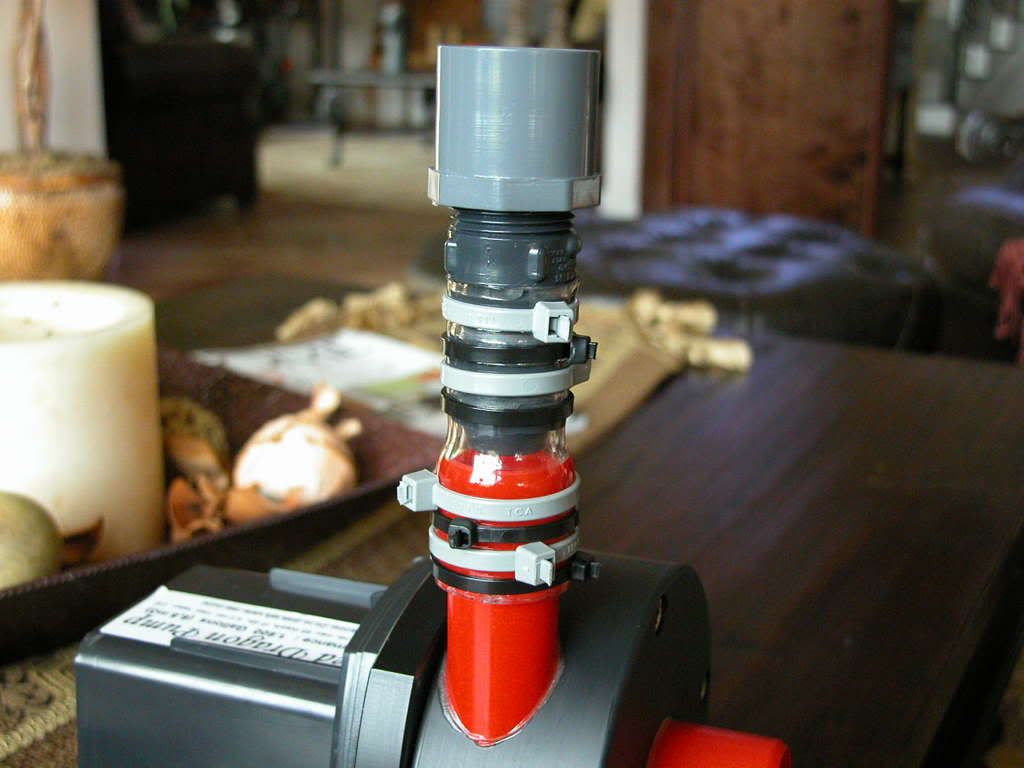
So here's what I worked on yesterday. As indicated in the photo above, I'm using a Red Dragon 6.5m3 for my main sump return pump. I chose this for many reasons, some being that it's deadly silent (I'm torn between calling it a ninja pump or a stealth pump), it requires very little maintenance due to the calcium bypass from the impeller, it creates almost no heat even when it's run internally, and it runs on only 65W. All of this comes with a price, but I became so tired of my Mag12 seizing and late night emergent impeller cleanings that it was worth it to me. This will probably result in more flow through the sump than I want, but I can live with that. I'm running it internally so I only need plumbing for the outlet. The only problem with the pump is that the inlet and outlet are metric sizes. It's supposed to come with silicone tubing but none is available currently. In case you want to see more photos of the pump, here it is.
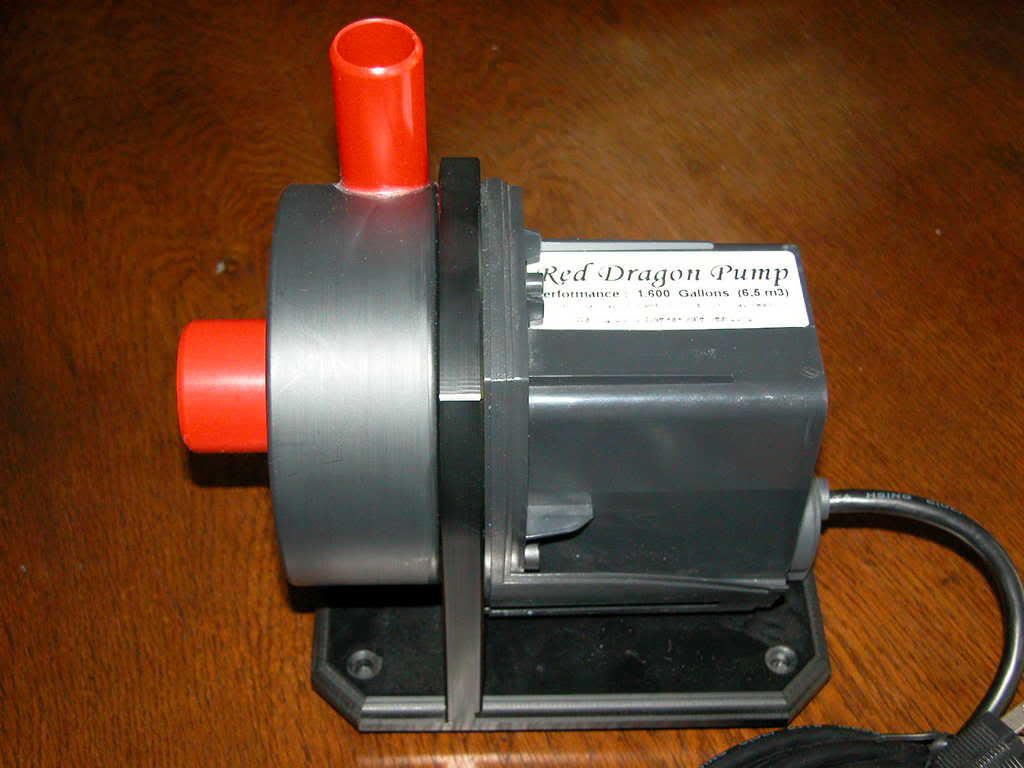
To get around the whole metric connection, here's what I did. I used a piece of 1" clear vinyl tubing, heated it in hot water, then with the strength of 10 men I applied it to the pump outlet. This was connected to a barbed fitting, followed by a threaded adaptor, and finally a SUBV was glued to that. The photo doesn't show it but, naturally, I used teflon tape at the threaded fitting. The connection was incredibly tight, and I would have to name it Houdini if it were able to pop off, but to make sure I added a bunch of zip ties for added security. I feel very confident that this won't come off unintentionally. Here's how I rigged it up.

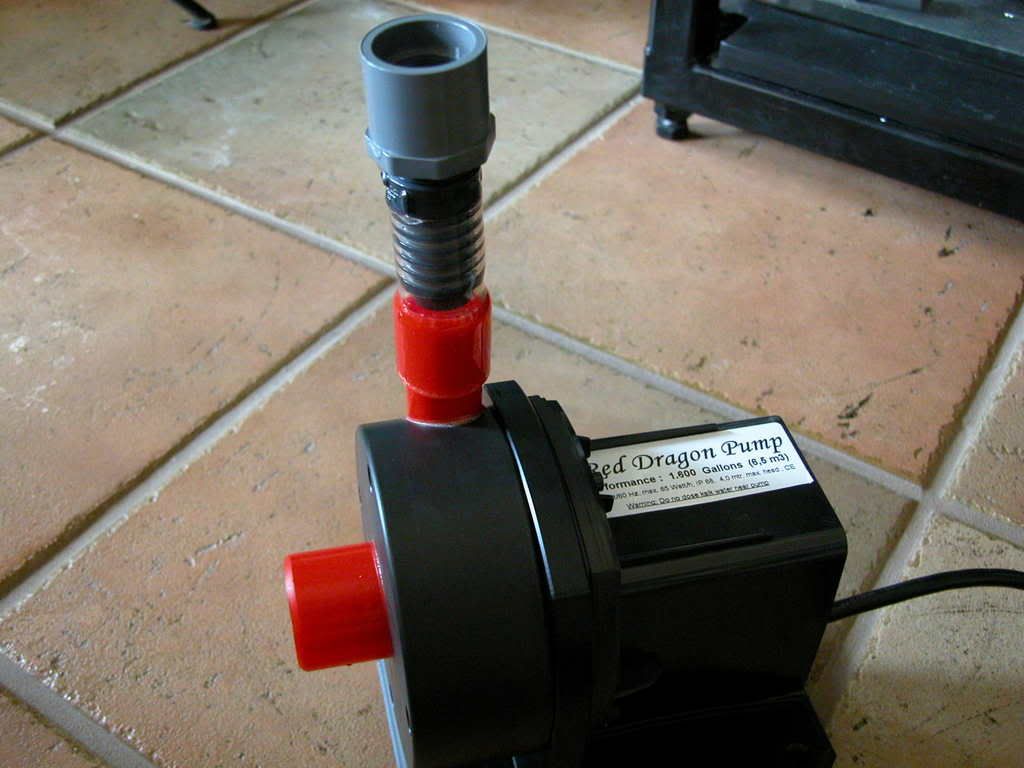
This will return to the underside of the tank via a 1" bulkhead in the overflow box, then to the tank via an OmniFlex nozzle. When I fired it up the it didn't work properly, although it tests out perfectly in a large basin. There's a problem somewhere in the return plumbing between the SUBV and the OM nozzle, I just can't seem to figure out where. There are no visible leaks anywhere. Maybe the riser tube inside the overflow box isn't seated well? I'll have to check that tomorrow. In the mean time, the pump is sitting idle in the sump.
-
Actually Gabriel there is a Red Dragon 2 pump. I checked it out in the ZEOvit forum. But that was still funny.
I'll know the tank is "ready" when the parameters are stable and all of my equipment is up and running. The ZEOvit guide (or maybe it was the forum, can't remember) mentions that new tanks are ready for stocking after running ZEOvit for 3-4 weeks. That's how long it takes for the bacterial populations to stabilize and to achieve a "low nutrient" state. The rate limiting factor for me will actually be the lights. I hope they're here in time, as I really don't want to rig my little 250W single MH pendant over the tank.
-
I wasn't really interested in an automatic reactor, since they're not yet 'tried and true.' I started dosing today, so it's officially day 1. After 3-4 weeks I should be able to start stocking the tank.
As far as the RD is concerned, mine can be plumbed internally or externally, I'll just need to acquire the proper fittings. If I run it internally I'll just need a screen to cover the inlet, but again I'm not sure if it will fit in the sump since the ZEO reactor takes up so much space. I'm not familiar with the RD2, is that a better pump? Geeze, just when I thought I knew what was going on out there, I get one-upped!
-
Looks great Aaron, is that a RD4.5 or 6.5? It seems to be doing its job! I just got my RD but I need to find fittings so I can connect the outlet to 1" plumbing, then I'll be set. I ran it in a tub of water just to check it out and it's a quiet beast, eh?
Mike
-
The tank's just been percolating for a while, without much action at all. That finally changed. I had been seeing lots of copepods on the glass, and now I'm seeing a ton of amphipods crawling all over the aquascape. The sand is developing worm tunnels, along with an ugly coating of film on the surface. But more importantly ...
I'm now officially a ZEOvit dude! I chose to use this form of filtration due to the glowing results I've seen in many of the European tanks, particularly those lit with T5's, as I intend to do. The corals just seem to have richer, purer coloration than most other systems, in my opinion. I also like the fact that it's a fantastic method to keep phosphates under control, which seems to be a hastle even for many of the more experience reefers out there.
I received my reactor late last week but didn't have time to begin setting it up until yesterday. It's a GroTech reactor and came with an Eheim 1250. Here's how it looks.
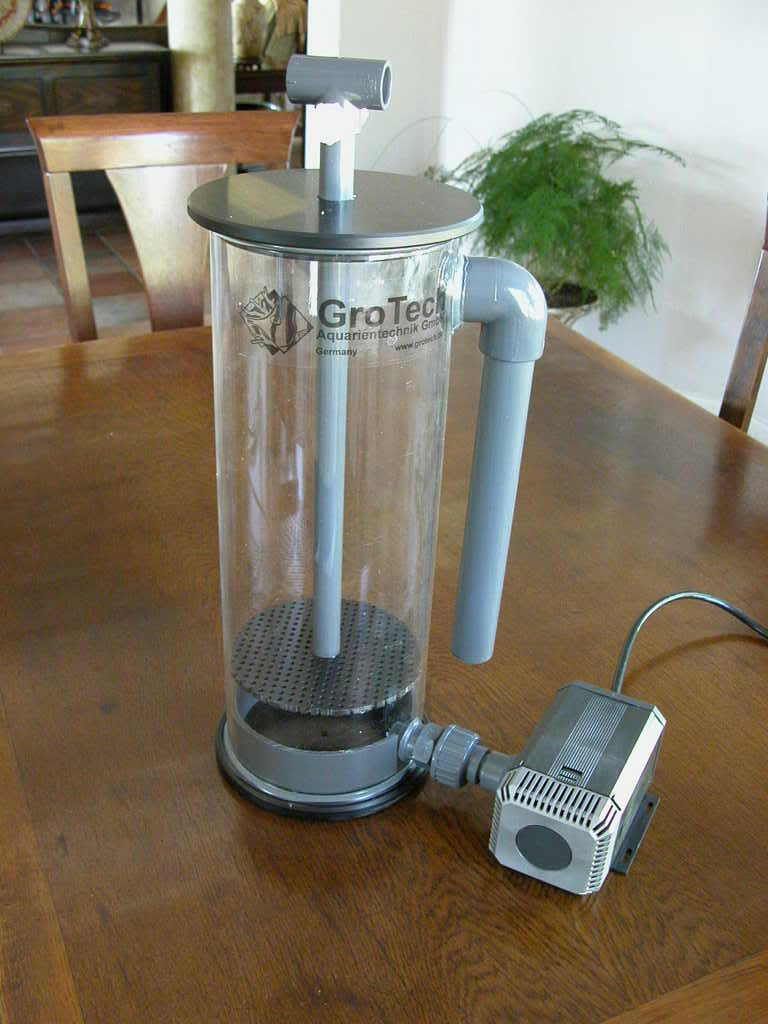
The reactor didn't come with a manual, and you wouldn't believe how difficult it was for me to figure out how to get it situated and running. First of all, being a German product, all of the plumbing is in metric sizes. This mattered because the Eheim puts out 317 gph, and I need to run only 150-170 gph through the reactor. I wanted to dial down the flow from the pump but instead thought I'd try to dial it down from the effluent plumbing, which is closer to 1", in order to conserve space in the sump. When I dialed down the effluect flow with the ball valve I installed, it simply flooded the top off of the reactor, rendering this option a dud. So I looked around my tank supplies and happened upon a MaxiJet600 which, as fortune would have it, puts out 160 gph. Perfect! I rigged this up to fit into the 20mm reactor inlet plumbing by wrapping the MJ outlet with teflon tape, and I squeezed this into a segment of 1/2" nylon tubing. This was secured with a plastic hose clamp, and the assembly was inserted into the 20mm plumbing. Here's how it looks.
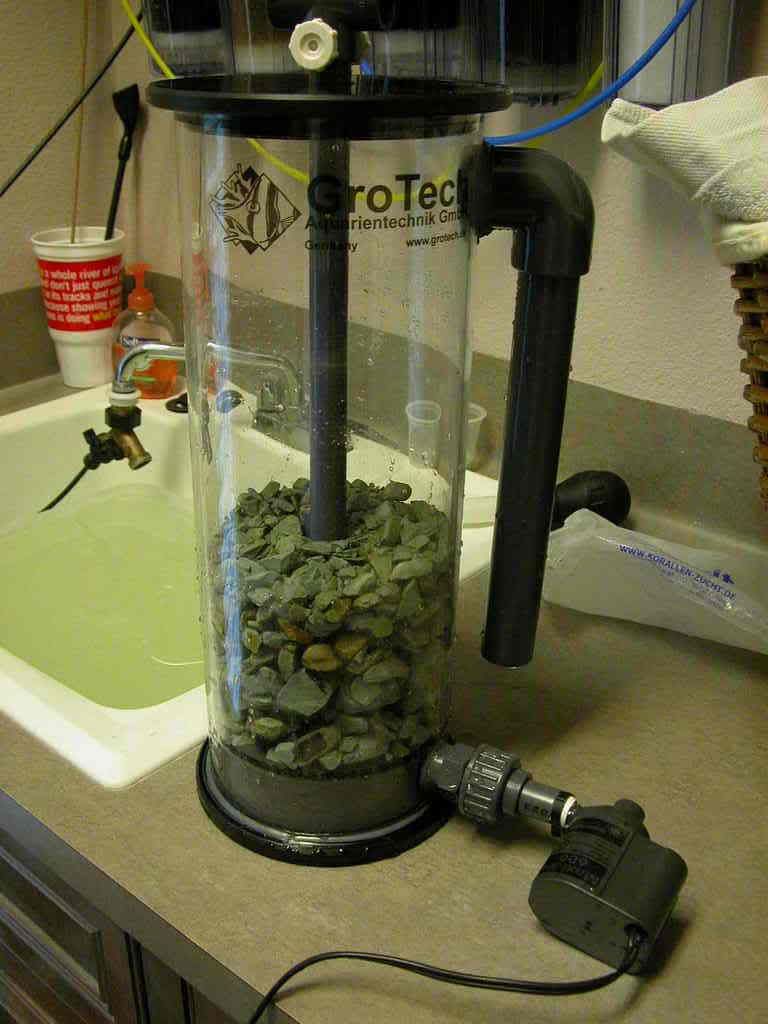

It's now running in the sump, although it takes up more room than I had anticipated. Once I add the gate valve to the Eheim pump, I'm not sure I'll have room in the sump for this.

-
 I know, it's a little schizophrenic of me, but "mojo" was already taken on Reef Central so I had to pick an alternate username.
Wait, who said that ... it was me, who are you ...
-
Thanks for posting all of those great photos, Marc!
Mike
(Dudester on RC)
-
Definitely a great day. I regret not being able to see all of the tanks, but the discussion around the tanks I was able to visit was very valuable. We (ARC) should do this more often, as it gives the tank owner and the visitors a tremendous opportunity to hear opinions that may have an impact on potential improvements. Threads are great, but there's no substitute for an on-site evaluation.
Marc, great to finally meet you in person. You'll have to come around again in a year and check out my home tank. I hope your visit was worthwhile.
Mike
-
I'll be a little late too, probably around noon. Hopefully I'll be able to catch up with you for lunch before the afternoon tour.
Mike
-
If Brian (makoJ or greenmako) is available then his tank will be a must see. I like the suggestion to position it between Gabriel's tank and my office tank. Hopefully John will be able to make contact with him.
Mike
-
Uhh, I know.

 .
. I know, it's a little schizophrenic of me, but "mojo" was already taken on Reef Central so I had to pick an alternate username.
FREE CORALS AND CLAMS, COME AND GET'EM
in Reef Keeping
Posted
Glad you like the clam! Please keep me informed of how it's doing.
Mike