


ChaosFyre
-
Posts
141 -
Joined
-
Last visited
Content Type
Profiles
Forums
Store
Gallery
Events
Local Fish Stores
FAQ
Blogs
Downloads
Posts posted by ChaosFyre
-
-
Fast forward to this past week and I see Allan is selling a pair, he shoots me some pics and I almost immediately recognize the female as my old female and my avatar! lol
I'm happy...
That premium blacker Ice male is amazing! Would love to see him crossed with some black swiss / shotgun black snowflakes. Need some pinholes in all that white!
-
Here's an update on the fish we are working with...
....
2) Phantom black snowflake (Sea and Reef) x Buckshot black snowflake (Proaquatix) (have not spawned) = Black Snowflakes
....
Really excited about this pair. Haven't read to the end of the forum yet, but do you have pics of them? Any spawn yet?
Found the video. Female is stunning, love her solid black face and slightly jagged white. The male's white shape and his shotgun markings are cool, but too bad about the orange face. I bet their babies will be perfect though! Great combination!
-
So while searching for a mate for our goldflake maroon I found this absolutely jaw dropping fancy snowflake at Alpha Aquaculture and had to get him. He will replace the black snowflake that we paired up with the new onyx female spawner (the female just wasn't taking to him):
This fancy premium snowflake is bred by SA

")
So you're the one who bought that clown! I would love to see it paired with the black snowflake. Still hoping for a "black swiss" clown/ buckshot black snowflake. I've finally got ahold of a black snowflake. I just had to wait a few months for ORA to release them! Picked it up from petco for $99.
Right now I'm looking for a frozen frostbite or black swiss clown to pair with it.
The breeder tank I bought ended up accumulating reef fish somehow... and live rock... and shrimp.....

But not to worry, my mom's old 30g koi tank is in the garage just waiting for the perfect pair.
Sorry its been a while since I caught up with this thread. Classes have kept me very busy. Its great to see you're expanding-- interesting idea with the closet.
-
Check out Omar's Candy Shop. Its a guy named Omar who runs a "store" from his home... he has at least 8 tanks, and great contacts. Ask to see the back room if you like SPS... He has auctions of those zoas on his Facebook too. Search the name of his shop on Facebook... PM me and I'll dig up his phone number too if you can't find him. He is in Cypress, basically Houston, but he is sometimes pricey. Don't be afraid to negotiate with him. Good luck!
-
By corals I meant zoas only of course lol. Though, I did buy a Ca+ test and I'm thinking of getting an rodi depending on the readings. My pink coraline algae came back when I dosed kent state coralvite. Can't wait for it to take over the purple and red.
-
Nice! Is that red thing your rbta?
I covet your corals. When you come to see my new lights can you bring some frags? Even one polyp of whatever I don't have. I'll pay or trade if you see any zoas you like here.

-
It sounds like this tank has well established bio diversity. More than likely, the thing with tentacles is a cucumber that feeds on particulates that comprise what is collectively called zooplankton in the water colum.
Considering your rush to get a new, unblemished tank for your bedroom; you might be an addicted reefer.
Laissez la bonne temps roulee,
Patrick
I would have to agree on all points! After seeing one worm across the sand, they are definitely some sort of tiny cucumber. Also my addiction has gotten worse in the time I've been away from the forum. I bought a new unscratched 38 gallon and a bunch of rock for both tanks, as well as some new livestock and a new reef radiance lumintek pro 240 led fixture. It should arrive in a week or so. I'll post updated pictures of both tanks then.
My next purchase will probably be an rodi filter and an led fixture for my breeder if I like the one that comes in.
Meanwhile my 48 inch T5HO fixture is for sale. I'm asking $250 negotiable and will consider trades.
-
The 38 gallon breeder tank now has 11 molly fry and two proud molly parents. They are all living happily in 1.025 salt water and the babies were born after about a month in the tank. The male is a dark dalmation, and the female is a creamsicle+light dalmation. The fry are probably a week or two old by now, and have definitive color differences. They are quite easy to feed and I haven't lost a single one since I first spotted them. The molly parents leave them alone. Other tank inhabitants are bristle worms, an odd sort of feather duster thing with tentacles instead of feathers, micro tube worms, a micro/mini six-armed starfish, and a hermit crab.
The tank is too scratched for me to want to keep in my bedroom, though I did get the entire setup for a good deal. I didn't want to start breeding clownfish in it because that would make the ugly tank "permanent". When I'm confident at raising the molly fry, I'll move them to a 20 gallon tank and hopefully switch my 38 gallon to a non-scratched breeder tank so I can begin breeding clowns.
In other news, my black clown has turned out to be the dominant female. I noticed recently that she is now noticeably bigger than the snowflake. Also, my display tank is overrun with corals... corals everywhere!!
-
Wow its gorgeous. I thought I had first dibs on Cameron's shipment of RBTA. Also, I didn't think they were in yet... don't tell me, did you convince him to give up his only RBTA?
My bad, Sarah. I didn't know I cut in line. I thought you may have already gotten one possibly. I had just been in touch with him and asked him a few times if he had any news on the anemones and he said "come on over, yours came in and it's healthy" so I went and got it. He had actually already sold his also so he doesn't have one at all in his tank. He said he's able to get more though. This thing is awesome. It's amazing how much they can shrink and grow. When I got it, it was about the size of a quarter, with a foot that was pencil thin. Yesterday at mid light cycle it had expanded to about 8" in diameter. My clownfish is absolutely in love.
Lol its okay. I'm actually glad I talked to you, I think I changed my mind again about getting an anemone... I'm too invested in the rest of my tank to risk it! If I find a good deal on mini-carpets maybe I'll get one. Or maybe I'll stick with ricordia.
Wow, crazy about the size. He told me it could reach up to 12" in height too.
-
Just wanted to say thanks again. You inspired me to try clownfish breeding... eventually lol. I traded for a 38 gallon breeder tank that is now in my bedroom. I think its done cycling, but its still in the diatom blooming stage. Not very pretty! This is going to be my "peaceful" tank so the clowns don't get bothered while they breed. I got another 10 gallon to use as a fry tank, and now I have a sizable collection of 5 gallon buckets to start a rotifer culture with.
However, I don't want to start too soon. I've got two mollies in the breeder tank but I want to make sure its really really cycled before risking my beloved clowns. The clowns are about 1 1/2 to 2 inches long, and are almost the same size. Do you think they are old enough to breed yet? I've seen them doing twitchy mating dances before.
-
Wow its gorgeous. I thought I had first dibs on Cameron's shipment of RBTA. Also, I didn't think they were in yet... don't tell me, did you convince him to give up his only RBTA?
-
First... the onyx picassos out of meta and looking sharp with their new stripes
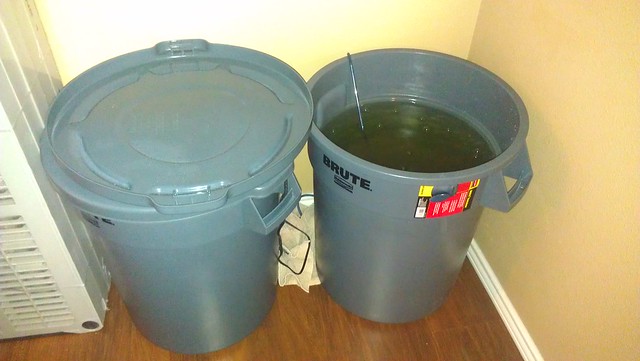
And next.. the rotifers. UGH! Like I said, the biggest issue for us throughout this entire process has been keeping up with rotifers. Well we finally decided to work with two 20g brutes and 2 5 gallon brutes. We will feed larvae from the 5 gallon buckets and will be using the 20g brutes as backup. Right now just one brute is going. After a week of not touching it we will split it into the other brute. Once we can get two brutes going full force we will remove the 5 gallon buckets. Hoping this does the trick.
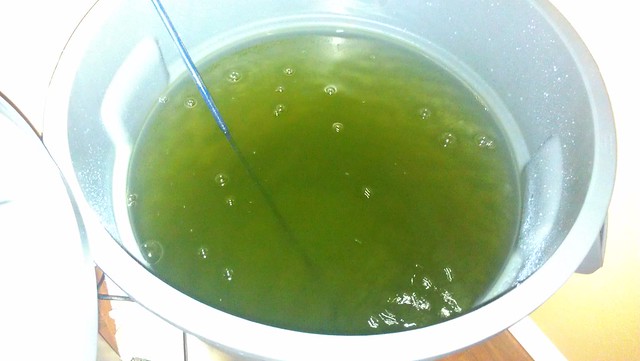
Here is a vid of larvae tank with a week old fry and a new nest in pot hatching...to get an idea of what our larvae tank looks like and a feel for the phyto dosing in larvae tanks. Not everyone does it like this but it is working for us:
Is that air stone directly under the hatching nest?
-
Here's another trick:
If you have a magnet cleaner that doesn't float, get one of those smaller mag-floats that does, and attach the smaller mag float to the back of the larger magnet cleaner. It will stick on its own because its also magnetized, and its strong enough to pull the larger magnet cleaner to the surface if you happen to drop it.
-
I've thought about buying the dollar store shells in the past but am concerned that they may have been treated with various chemicals/cleaners that I don't want to introduce to the tank. Have you had any problems along those lines?
No problems. I did rinse them pretty well before I put them in. They were only decorative so I don't see any reason why they would have treated them either, though.
-
Dibs on the red zoas and the candy canes.
There may be more I'm interested in... like those purple eye green skirts. Are those dragon eyes...? The look different under your lights. -
Thanks guys.
Dustin, maybe you and John can get together to figure out how to make the LED thing.. but then again, you've already got yours!
Hey, I saw an LED fixture that would fit your hex tank perfectly. It was $25 on craigslist... but that was a couple weeks ago. I was really tempted to pick it up but I got my breeder tank instead.
-
Lol @ the potato chip comment.
I'm not great at fragging zoas either. I tried once and most of them died. Then dustin tried using a carpet knife and he managed to peel up the mat. He gave me 90 polyps of his dragon eyes on his first try ever fragging zoas, and all of them survived. In the future, we should commandeer his services in zoa fragging.

And yeah, I'm looking forward to the RBTA. I think Cameron told me you saw it and decided you wanted one too hehe.
-
I bought a used JBJ Trinity T5HO Light Fixture from someone on the forum, intending to repair it. Two of the four moonlight LED's had burned out, but the fixture was otherwise in great condition and we got a great deal on it.
I had trouble finding out where to buy the exact LED's that it came with. I called the manufacturer, intending to order the exact same LED's from them but they said we would have to send the entire fixture in if we wanted it repaired (to do that, we'd probably need a current warranty, receipt, etc, etc.) I told them we could solder it ourselves, and they said getting a hold of the LED's was impossible unless they had someone send their fixture in for repair/replacement (I guess they intended to strip some used LED's and send those to us?). We waited for a few weeks for them to contact us about when the parts were "in stock", and were never contacted again.
So here is a guide on how to repair yours by yourself!
Things you'll need:
1. The Fixture
This can be any JBJ Trinity Light Fixture, regardless of length, as long as it uses "1 Watt Nite-Vu LED moonlights". Indeed, even if your fixture uses a different type of LED than this, as long as yours uses 1 watt LEDs, it can't hurt to try. Even if the LED you bought is not the right wattage, the worst that could happen is you burn out the new $2-3 LED that you bought. So give it a try!
I did a simple google search and took this screenshot of the fixture, which includes its full name, found for sale new at MarineDepot.com. I'm showing 48 inch because that is how long my fixture is. I left the website link visible for reference:

A screen shot of the Detailed product description, where you can find the wattage of the LED's on the fixture:

A picture of my fixture just before we began work on it:

Here it is plugged in, you can see the two bulbs that work and the two bulbs that don't. Also there is a closeup of a working Nite-Vu moonlight LED that came with the fixture, and a close-up of one that no longer worked, which we de-soldered from the fixture. You can see the corrosion around the broken LED:


2. A soldering iron, which you can get for $9.99 give or take depending on the quality of the iron and the extras that come in the kit. Check Radio Shack, Home Depot, Lowe's, or other similar hardware/electronics stores. You'll also need some solder wire, and a wet sponge to clean the soldering iron tip, or bronze wool if you really want to go professional with it. Here's a great How To Solder video for beginners:
Warning: Soldering irons can get very hot, between 250-400 degrees Fahrenheit depending on the wattage. Do not touch the metal tip, don't leave it where it can drop or roll, don't leave it plugged in when you are done, and don't let the tip touch anything you don't want to damage! Be very aware when using one. Keep your kids, pets, and other distractions far away or well-contained. However, don't be afraid of your iron--this is an everyday tool that CAN be used safely.
You'll also need some solder sucker or solder braid/wick to suck away the solder when you de-solder the broken LED. Here is a video demonstrating a few techniques for desoldering:
3. A philips head screw driver
4. Electronics Cleaner (not pictured)
5. The new LED bulb
We tried 3 different kinds of LED bulbs from Radio Shack, and a fourth that we'd ordered online, before we found which LED works well with this fixture. The total cost of all 4 LED's was around $8-10. Here are some pictures of LED's that we tried:
These burned out during testing:


This one worked:

Here is a website where you can order the LED we found that worked. They come in several colors on this website, and as far as we can tell, are identical to the ones in the light fixture. The one in our photographs is green (my room mate just happened to have the EXACT LED we needed lying around. I asked where he got it from and he gave me the website. We have now ordered two blue ones, one to solder on now, and one for later incase another goes out).
Its called a 1 Watt Blue High Power LED, or Star LED, and you can order from
http://www.futurlec.com/Star_LED.shtml

WARNING: READ THE ENTIRE GUIDE BEFORE YOU BEGIN FOLLOWING THE STEPS
DISCLAIMER: I'm putting this guide out here because I couldn't find any information on how to do Do It Yourself, and since I had some success, I wanted to be helpful and share it with everyone. However, I AM NOT RESPONSIBLE for any damage you do to your light fixture, LEDs, person, etc. I recommend shipping your fixture in for repairs (especially if its still under warranty) or calling a repairman or electrician for help if you feel uncomfortable with any of these steps.
Step 1:
Unplug the fixture. Unscrew the clear plastic caps protecting the LED's from water damage. Be gentle screwing and unscrewing the caps because applying too much pressure could crack the plastic cap.
Step 2:
Use electronics cleaner to clean the LED board, LED, solder, and all around the area really well. You can clean the cap too. Do this a few times, as needed. Wait for it to completely dry, then turn on the fixture. I recommend cleaning all of your LED's, especially if you see water stains or salt creep or corrosion. If your LED's still don't work after being cleaned, then proceed to the next step.
Step 3: Pull the little LED board away from the fixture. You should see two wires pull up with it. De-solder these wires from the LED board to free it. Its not a big deal if you make a mistake here-- the LED is broken and you can't make it worse. If you damage the wires, you can always cut the wire shorter and strip the wire jacket back to expose some wire again.
Step 4: Because both wires on the fixture are black and look identical, you need to find out which wire is positive and which is negative before you can solder them onto the positive and negative pads or leads of your new LED. If you are going to solder an LED that is on a board, the board should have plus and minus signs next to the corresponding pads. If you are soldering a naked LED with wire leads sticking off of the LED bulb, the longer lead is the positive (or anode) lead.
You must attach the positive wire to the positive connection on the LED, and the negative wire to the negative connection on the LED, or the LED will not light up. A quick way to tell which wire is positive and which is negative is to turn the fixture on and touch the two wires to the appropriate spots on the LED. If the LED doesn't turn on, then you have it backwards. If the LED turns on and stays a steady bright color for mores than a few seconds, you should proceed to the next step. Also, sometimes, LEDs will work for a short time (a few minutes to a couple hours) before the current overwhelms the bulb and it dies. If you can find a way to keep the LED attached to the wires for a good hour or so, you will have a better idea of whether your LED bulb will work with your particular fixture in the long term. Otherwise, hold the LED there for a few minutes, or as long as you are patient for, and move on to Step 5 if all seems well.
If the LED glows faintly, or glows bright but then dims, or if it flickers and goes out, begins to heat up quickly, then the LED is probably not the right wattage. It will not work with the fixture, and by testing this incompatible LED bulb you have burned it out. This LED bulb is now trash (you have lost only $2-3 so its okay). Do not continue to the next steps. Sorry, try again with a different type of LED!
A picture of us testing an incompatible LED bulb by touching the appropriate pos/neg wires to the appropriate pos/neg leads. First the bulb looks bright. Then it faded and died. For a while, the 2nd bulb in the circuit stayed lit up before it too went out again.:


A picture of us testing a compatible LED by touching the appropriate pos/neg wires to the appropriate pos/neg pads on the LED board.


OPTIONAL: Use a multi-meter to check if the wires on the fixture are getting voltage, and also to check the polarity of the wires (which is positive and which is negative). The fixture must be turned on to do this--don't touch the two wires to each other or it might cause a short-out.
When the multi-meter reads positive, you are correctly touching the red (positive) wire of the multi-meter to the positive wire of the fixture, and the black (negative) wire of your multi-meter is touching the negative wire of the fixture. Now you know which wire is positive and negative. If you get it backwards, the multi-meter will give a negative number, but it won't cause any harm.
Some pictures of testing the wires' voltage and polarity with a multi-meter:


Step 5: Solder the positive wire from the fixture to the positive terminal of the LED. Solder the negative wire from the fixture to the negative terminal of the LED.
If you are using a naked LED bulb with leads sticking out, you can trim the leads, but make sure you keep the longer lead longer than the shorter lead so you know which lead is positive. After you solder the leads to the wires, you should use electrical tape or heat shrink to protect the soldered connection.
If you are using an LED bulb that is seated onto a little board like my fixture originally came with, you should solder the wires to the proper pos/neg pads on the board. The board has a + or - sign written by the corresponding pads.
Step 6: Test and see if your soldering job is good. Tug the wires a little bit and if it doesn't come undone, you've done a good job. Turn on the fixture, and if it doesn't light up, you haven't made a good connection. Unplug the fixture and play with the solder a bit more before you try to light it up again.
Step 7: Put the fixture back together: push the LED and wires back down so they are as flush with the fixture as possible. Put the cap on and screw it gently into place.
In our case, two LED's were burned out in our fixture (or so we thought). However, when we repaired the worst looking LED, the other broken LED came on! We figured that the first two LED's are on their own circuit, and the second two LED's are on a different circuit, so if one goes out the second one doesn't get power. If you have the same problem as we did, you should replace the worst-looking, visibly burned/busted, or most corroded LED bulb first and perhaps you'll be lucky and the second one will come on!
-
Been on here about a year now and realized I've never posted in the tank journal section. So here's a ton of pics of my tank. Some of you will recognize many of these corals as this forum has been big in helping me stock my tank.
A little history. Kept planted freshwater tanks for years. Got a score on a 55 gallon FOWLR tank a year ago. Came with tank, rocks, sump, skimmer, lights, and fish for $200. Over time I've collected corals, cleaned up the water, learned about testing and chemistry. Now here is where I am today.
55 gallon display
15 gallon sump
Eshopps psk75 skimmer
Mag 5 return
Koralia 750 and 1050 powerheads
Mj1200 powerhead
Aquatic life 4x54watt t5ho
Ati blue+
Ati coral +
Ati blue+
Ati purple+
Brs dual reactor with brs gfo and rox0.8 carbon
Kalkwasser administered through jbj ato
Red Sea coral pro tests
VeeGee refractometer
Temperature 80 degrees
Salinity 1.025
Calcium 420 ppm (red sea pro)
Alk 8.7 dkh (red sea pro)
Mg 1350 ppm (red sea pro)
Nitrate 0ppm (API)
Phosphate never tested
Clarkii clownfish
Pajama cardinal fish
Royal gramma basslet
Azure damsel
Tons and tons of cuc
Wanting to add one or two more fish. Maybe a Firefish or a banggai cardinal. Favorite small fish is a leopard wrasse but I don't have the right sand or skill level for those.
What are your red zoas with the purple eye and skirt? If you ever have frags of that I'd love one. Did you ever get a frag of that eye of rah from me? Do you have a pic of that up there? I can't remember who it was, but I gave someone a ton of it off my decorator crab, and that they showed me a picture of what it looks like under good lights. I remember it looked way better than in my tank.
-
The rock I'm ditching is Texas holey rock. It's usually a decorative yard rock and is dirt cheap here in the southern states, but super expensive up north from what I understand. It's just limestone with large holes in it. Almost zero porosity, super dense and heavy, and offers virtually no biological filtration value. It came with the tank and I was none the wiser. The rock I'm replacing it with is actually some pieces I picked out from Dustin's tank, BEFORE it was Dustin's tank. I went and saw the guy that was selling it and bought a few large pieces. Theyre insanely porous and oddly shaped. Good stuff. I did a 1:10 dip of muriatic acid:water to dissolve any phosphate on the rock and that made it even more porous. Like a sponge. I'll get around to re-scaping with it one day. You're welcome to the holey rock, but I'm telling you it's worthless. Best kept in the flower bed or in an african cichlid tank to help buffer the water.
I got my BRS reactor for christmas last year. I had been wanting to buy one, but like you I was on a strict budget, and when you've got a family, and the hobby isn't everyone's, just yours, its tough to justify large purchases just for fun. Score on christmas gift.
I can test your calcium for you, but honestly, with your water change regiment, and lack of heavy stony coral load, I wouldn't even worry about calcium. Your soft corals use virtually zero calcium and will do fine with lowered levels. I didn't start testing calcium until like the 8 month mark when I decided to transition to SPS.
For magnesium I use BRS magnesium mix. It's a bag that makes a gallon of magnesium solution. It's like $10. It's a mix of magnesium chloride and magnesium sulfate. It makes a fairly weak mixture compared to the Kent stuff, but it does its purpose. You can use epsom salt to elevate your magnesium but may want to continue with large water changes so you don't have a big rise in sulfates in your water (which may or may not be an issue, i've read both).
As far as dosing in general, since I like to keep SPS, I like to maintain good levels of calcium and alkalinity, clean water, and seldom water changes. I don't have a calcium reactor, controller, or dosing pumps. I'm sure one day down the road I'll get there but just not really in the budget.
I dose calcium and alkalinity with kalkwasser (mrs wages pickling lime, $3/lb, lasts forever). I dose that via a tom's aqualifter pump ($12) through my auto topoff. I'm only running 1/3 strength kalkwasser right now to meet my needs so that's good. Lots of room to increase before I need to move to something stronger. years down the road likely. For my tank size kalkwasser is perfect. I dose magnesium because kalkwasser tends to deplete it more rapidly than other methods, and low magnesium tends to result in algae growth and calcium precipitation. Super easy. Takes me a total of about 20 minutes a week, to test the water and mix my kalkwasser.
Best of luck with the job hunt. I'm working and get plenty of hours, but since it's not in my degree field it "feels" like unemployment. I'm still holding out for my real job which will like quadruple my income and bring benefits. Fingers crossed.
I only posted recent pictures of the tank. I'll hunt around and see if I can find some setup pictures. It was an ugly 6-8 months of horrible algae, dinoflagellates, and cyanobacteria blooms before the water cleared up and the colors started popping. I didn't take many pictures back then because I was fairly ashamed of my tank lol.
Lol about the algae. My god, I'm still not sure what is up with my tank and its resistance to algae. Finally, FINALLY, there is a little bit of green on the glass near the substrate bed.
The job thing is great, just need to complete my paperwork and I start sometime this week I think. I know what you mean about jobs out of your major. Delivering pizza is quite different than researching Alzheimer's (which I used to do).
The rock I picked up from the landscaping store is pretty useful for building neat structures, if you can hide the landscaping rock behind some nice live-rock. I'm pretty attached to the shelves I made and how easy it is to catch critters from my tank. Plus the fish love the narrow crevices between pillars. Oh yeah, and I tested the phosphates in my tank and I shouldn't have been worried (of course, because I never have any algae). Phosphates are exactly the same as nitrates 0-5 ppm. I still have your tank water in that cup I can test if I remember, and I'll tell you what it is. It may have changed over time after sitting in that paper cup for so long, though.
The rock I'm getting for my new breeder tank is fiji purple live rock. It'll definitely look a lot different than my DT, and I'm excited about it.
It seems like you've found a great cheap way to dose your tank. When its time for me to start, I may ask you more about it because I didn't understand half of what you said lol.
-
So I came in from the store and its a very bright and sunny day here in good ole college station. As I walk in I keep on my sunglasses. I notice my tank actually looks way better with my sunglasses on. The corals all still pop and fluoresce real well, but the bright blue glare is gone. Decided to take a couple pics. Here's an iPhone pic with nothing done. Just a straight picture. Then I put the sunglasses over the camera lens. The difference is pretty neat.
Holy cow this is awesome. It looks great! You must have polarized sunglasses, filtering out all the UV light that the camera has trouble reading. I might try this if I can ever find my sunglasses.
-
Okay, so I traded my 48" T5NO lights for a 38 gallon breeder with a marine-land biowheel filter, 40 lbs or so of aragonite, a T5NO light fixture to fit the smaller tank, and a stand (and now also the powerhead). It was a great deal so I'm trying to pay them back with coral frags whenever possible.
We put the breeder in our bedroom at the foot of our bed and it looks amazing. I kept some of their old water and a teensy bit of their live sand to help cycle the tank. I used a dinner plate to break up the water flow when I poured the water into the tank, so the substrate wouldn't get stirred up. The tank cleared within hours. I'm getting 40 lbs of purple fiji live rock for $3 per pound from Cameron on Monday. Here are some pictures right after I got it set up:


-
Looks like a bi-color frogspawn. A mix of green and purple tips. Those are cool. Good to see the Xenia has attached and looks healthy
Thanks for it, by the way. If you have more you want to give away, those new friends of mine, Kyleigh and Taylor, need corals to fill up their tank. I gave them a tiny frag of kenya tree, a single polyp of eye of rah that had escaped the colony, and some of your halimeda algae to put in their refugium. I didn't give them much, just stuff that was easy to pick up cause I'm not confident about fragging yet lol.
There's a guy at petco I don't know his name yet, but he said he has a lot of waving hand anthelia to give away. I suggested they talk to him. They're a really nice couple, we've met a few times now. They're bringing me a great powerhead that can double as a sump pump for free on Tuesday. They got me into the salt-water molly thing.. I fell in love with their baby dalmation mollies. Both cameron and they have monstrous salt-water mollies that just breed in tank. Mine are acclimating now.
-
Wow, weird information about the mysis. There are so many interesting things in this hobby. So when will the picasso/onyx babies be ready for re-homing? I wonder if one of those wouldn't make a great parent for a new strain of black snowflakes. The only orange is on their extremities. However, some people are against mixing occ and perc. I'm on the fence about it, but in general I lean toward "more variety in the genes = healthier" and "purepred = inbred = bad".


Breaking down
in Hardware
Posted
Tell me about the sump, return pump, overflow, and skimmer. Are you willing to sell these separately?