


hobogato
-
Posts
136 -
Joined
-
Last visited
Content Type
Profiles
Forums
Store
Gallery
Events
Local Fish Stores
FAQ
Blogs
Downloads
Posts posted by hobogato
-
-
here it is around new year's day - after beginning treatment of all acros for AEFW.


here is the redisigned aquascaping

and here it is currently - two weeks after finishing AEFW treatment and placement of corals back in the tank - they are really starting to color back up

full front

left end

center

right end

-
also added a side table that houses a 50 gallon clam tank - plumbed into the sump thru the wall


here is the display tank in november of 2005

here it is in november of 2006 1 year old

-
the seio setup

filtration running (left to right)


-
some of the various things i built for the tank
sump/fuge

skimmer

running

reactors

running

SE reflector


DE reflector
before

after

-
specs:
240 long from glasscages with overflows in the ends since it is a room divider
6.5' long sump/fuge i made with 4 compartments - LR rubble, skimmer compartment, fuge with deep sand bed and mangroves, and return pump area
mag12 and mag18 for return pumps
single beckett skimmer that i made supplied by a mag12
dual chamber calcium reactor and a kalk reactor that i built
3 SE 250 watt MH with luminarc copies that i made
2 DE 250 watt MH with upgraded reflectors in pendants
8 @ 65 watt PC true actinic
75 blue LED moonlights
four seio 2600's on two controllers and a tunze powerhead on single controller.
October of 2005
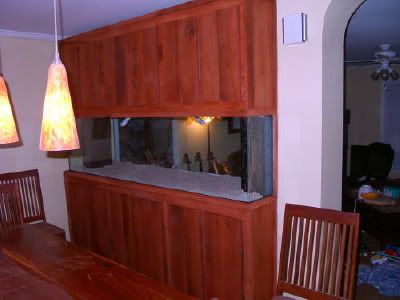
framed out stand after removing back half of the wall

skinned with pecan and cherry wood

tank sitting in place the day we brought it home


unfinished canopy on dining room side

woodwork on living room side

painting, staining and sealing done

-
i purchased texastodd's sps setup this week to combine with mine, and am parting out the things i dont need and selling frags of LOTS of LE sps and other rare or hard to find sps.
here is a link to my post on maast
please call if interested as i will not have alot of time to check back here over the next week or so
2106573415
thanks for looking
ace
-
checked the scrap pile, and the only piece i have big enough is black - guess that doesnt help ya much. sorry.
-
ill check the garage, and if i have a piece that big, ill bring it with me to the maast meeting today.
-
replied on maast also, gimme a call and ill see if i can talk ya thru it.
2108466784
ace
-
looks great clint - cant wait to see it full!
-
bump - added bulbs, and they are ready to go.
-
I am replacing my two magnetic ballasts with new electronic ones, and will need to sell them early next week when the new ballasts get here. they are a year and a half old and i bought them new from hellolights for $129 each. would like to get $80 each or $150 if you take both.
FREE with purchase of ballast - a coralvue 14k SE bulb or XM 15k bulb. they have about 8 months use @ 8 hours a day.


-
hey james - sorry, i have been kinda scarce around the boards lately. anytime you want to come by and see how i did the tank (as a room divider) and the clam tank that you asked about before on maast, you are welcome. ill send ya a pm with my phone # so you can gimme a call if you want.
-
from what i read, the levamisole hydrochloride (levasole) that i am using for an AEFW dip is supposed to kill these guys too, but as always - not the eggs.
-
sure stephen, just gimme a call 2108466784
-
i build em here in SA, here is a gallery of some of my work.
-
if the metal halide bulb is double ended (DE) - i am assuming it is because you said HQI - then you have to have the glass shield in place. SE bulbs are made of a thicker glass, so they shield the corals from too much UV by themselves, but DE bulbs are made of thinner glass and must be used with a glass shield to prevent UV damage to fish and corals. you do not have to use a glass shield with the PC bulbs.
-
i have always heard that it will cause them to brown out. in my tank - lots of fish, and heavily stocked - they tend to turn green when i first get them and then slowly get back to their original colors. maybe there is some truth to it.
-
took me about 8 hours to finish the second skimmer - here are some pics
bending the back

tapping threads for levellig screws

glueing


redneck clamp

finished skimmer - drain is cut long right now, will cut to fit on installation


-
hahaha - you know - theres nothing like a spray of saltwater to the face to really wake you up in the morning. hooked up the skimmer this morning and figured out that it wouldnt work very well with the becket in upside down :lol also figured out that the air valve will shoot a pretty good stream of water when the beckett is upside down
after correcting, it runs great - this is after about an hour
-
well, i am building (at least attempting to) a hang on back beckett skimmer for someone, and decided to try a new design to keep all microbubbles from dumping out the drain into the display. a few of the times i have posted finished projects, people have asked if i chronicled them, and i never had - so i decided to do that this time. i didnt want the HOB to be untested, so i decided to build one for myself (in sump) using the new design to make sure it would work correctly. as you can see - i could use a new skimmer anyway:
my skimmer - dont laugh, it works great, it is just really ugly because it was one of my first acrylic projects - before i even knew how to use weldon. it is held together (and has for almost two years) with nothing but silicone and a plastic frame on the outside of the box.

so i started with a couple of pics of the materials - $100 worth of acrylic and $140 worth of PVC.


it took me about 45 minutes to cut all the tube pieces for both new skimmers

and about an hour to rough cut all of the flat pieces for both skimmers

it took me 45 minutes to sand all of the ends of the tube smooth by hand

it took me about 15 minutes to run all the flat pieces through the jointer to make the edges perfect. on my last wookworking project, the violin, i found out that even though you have the jointer set to take 1/32" off of a piece of wood, it takes alot more off of a finger if you mess up - but that is all healed up now.
(notice how i still keep that pinky curled under, away from my other fingers tho now
)
look how nice those edges look

it took me another hour to do the finish cutting on the flat pieces with the router.
it took another 4 hours or so (with some beer, er i mean wait time scattered throughout - notice i saved the beer time until after finishing with the jointer) to finish putting it together and plumbing it.
heres one step close to the end

and here is my new skimmer.
i will hook it up tomorrow and see how it does. once i see it in action, i will make any adjustments needed to the design before finishing the HOB one. ill post ther rest of the process after i finish the second skimmer.
-
Hobogato, is the solar tube material the right stuff?
that's the right stuff
-
i am using reeflux in my DE fixtures, and i like the 12k better than my previous, the 10k. when it is time to replace my SE bulbs i am going to go with reeflux 12k in those too (running standard coralvue 14k right now - just a tad too blue). my corals are really starting to get some great colors also.
-
finaddict is near 1604 and 35.
if you are heading up 281, aquatic warehouse is just off of 281 near the airport, and cb pets is at loop 46 and 281 about 20 miles north of 1604.
ace's 240 reef
in Tank Builds
Posted
here is the last change i made to the tank - i have upgraded just about everything possible in the last few months, so now it is time to watch it grow
well, i have been holding on to my pc actinics for long enough, and finally decided to switch over to T5 for actinic suppliment instead. i was running eight 65 watt actinic retro kits on my tank, and decided to switch over to eight 24" and four 36" high output T5 bulbs. i went to workhorse 7 ballasts for this - three of em. the bulbs i chose are the URI super actinic that supposedly put out 40 watts on a 24" and 65 watts on a 36" if you have the ballast power to do it. so if that is true, i am now running 580 watts of T5 lights. here are a few pics.
i used solartube material to make the reflectors.
tank with PC actinics
acrylic shells i built to house the T5s
the two configurations i used
2 X 24"
a 24" with a 36"
one side installed (looks the same on the other side of the tank) they BARELY fit!
cruddy full tank shot with the T5s - with the PC lights, my camera wouldnt go faster than 1/6 of a second exposure, where with the T5s, it was set at 1/30 of a second - translation, the T5s are WAY brighter