


ckimble
-
Posts
148 -
Joined
-
Last visited
Content Type
Profiles
Forums
Store
Gallery
Events
Local Fish Stores
FAQ
Blogs
Downloads
Posts posted by ckimble
-
-
bad a** skimmer!
-
sweet tank!
Welcome
-
Most everything is complete...
I have been working at tying up all the loose ends and am very close to making the big move. The last addition was to upgrade my feed pump. I went from a weak mag7 to an overpowered mag18 I picked up at River City. It cost me a bit more than online, but they have always taken care of me when I needed it. Nice to know that if the thing fails I can just go in there and get an easy replacement. Try that with an online sale...
here are the pics


Here is the plumbing setup, I tied into the chiller line to do quick water changes. I have tested it and it works awesome.

'fuge shot


-
It is roughly 4x4x8... If that works you are more than welcome to use it when I am done.
-Craig
Thanks Craig....I'm wondering if it will be big enough for a 4"-5" tang. Well, we'll give it a try. I've notice that you live in Cedar Park, what part of it? We live in Leander.
I have plenty of acrylic lying around so if you need a bigger trap, I am sure we could work something out.
-
Nice trap!
I wish my tang thought so... Every other fish has been in there to check it out except the one I want to catch
-
It is roughly 4x4x8... If that works you are more than welcome to use it when I am done.
-Craig
-
I decided to transfer a couple of fish to the new tank since 1)They are crowded in their current home and 2)they keep knocking corals over because of number 1. My Regal tang just fragged my idaho grape cap again so he is the first to go. I built this fish trap out of some scrap acrylic I had laying around so the hunt is on...
When I am done with the tranferring the fish, and if there is interest, I am willing to donate it to ARC as a community resource for anyone else that may have a need for a fish trap.
shhhh don't spook the fish

-
Got the canopy mostly wired and mounted, that sucker was heavy to put in place too. Right now I only have one 175W MH lamp over the tank with the actinics which is a temporary solution. I still need to order one more ballast and the bulbs to go live. I figure I can get the algae bloom out of the way with that crappy bulb before I start moving my LR and livestock over. This weekend I built the doors for the canopy, and am in the final stages of staining and sealing those. I figure mid-week I should be able to install them. That will be nice as the actinics are casting a very eerie blue glow out our front window. Plus my wife is not overly impressed with the towels as temporary doors.

The other really cool thing is my shiny new Tunze Wavebox I picked up from Bruce at Aquatek. I always said they are one of the ugliest thing to put in a tank but you just can't beat the wave motion from these things. I lucked out and was able to put it in the back corner of the tank so it it kinda blends in with the background for now. The wavebox coupled with the OM closed loop creates amazing flow in the tank. My canary-in-the-coal-mine Green Chromis is loving life swimming in the flow.
Tank shot

And a little video of the wavebox in action

-
The way it is mounted there isn't a easy way to raise the bulbs. If this becomes an issue, I can always spread some eggcrate or something across the top with some screen and slowly remove layers.
Thanks for the comments...
-
It took me longer than I expected to build this canopy, but am really happy with the results. With a 30" deep tank I needed something that was very open for maintenance access . I think I nailed it. I spent yesterday mounting the Luminarc reflectors. It was a tight fit, but should give me a nice spread of light across the tank. Yesterday I picked up the T5 endcaps to mount the actinics. I am hoping by the end of the weekend to have this thing wired and ready...


-
Sorry to hear of your troubles Karen. I doubt you'll have too much trouble selling this setup.
Good luck,
Craig
-
I have been playing guitar on and off for the last 18 years. More off than on for the last 8 years though. I think my last gig was over 5 years ago. I've thought about getting back into it, but between the other bazillion guitarists in this town and the fact I am really rusty at it. It is better if I just leave it to the professionals.
I always wished I learned the banjo... I love bluegrass as well
-
I'm available to help again if you still need the help.
-
Since I helped bring in the 200 I feel I have a vested interest in seeing this thing up and running... I'm in
-
WOW!

-
Depending on when, I can probably help out... When are you planning on doing the move?
Hey guys. I'm going to need some help moving my 90 gallon tank (1/4 full) about 12 feet across the floor. That way I can install the new tile floor and then the new 200 gallon tank.I think Andrew said he was in so if I could get 2 or 3 more people it should be a snap (maybe a poor choice of words when talking about moving a glass tank).
I will be draining the tank to a couple inches over the sand bed and removing some of the live rock into some tubs to lighten the load then I'm going to pick up some of those heavy furniture disc to slide under the tank and I hope it will glide across the carpet with not problems. At that point I need to put the rock back in the tank and let it support everything for another 2-3 weeks. I can guarantee that there will be some frags because I always breaks tips when moving rocks in and out of the tank so if you wanted something now would be a good time.
Here are some pics of the tank as it sits.
Thanks.
Aaron
-
I have been really bad in keeping current with this blog, but have been pretty busy lately. Anyway, lots happening with the new setup. It is full of ~200lbs of base rock, 150lbs live sand, and freshly mixed Tropic Marin Pro. I mixed the water last weekend and got the cycle started last Monday. Haven't tested today, but Wednesday I was still reading amonia and nitrite. My next update should be with the canopy as that is next on the list. Right after I finish up a sump, canopy, and stand for a friend.
Here is a current FTS

-
It looks like you are going to be passing all of the flow through the main refugium. Typically you want reduced flow through a fuge. Have you thought about flipping the return pump / refugium area? You can still feed from the main drain just T-off in 3 directions to feed the mangroves, skimmer, and fuge sections.
-
That sucks Joseph.. If I had the room I would take a bunch. Best of luck
-
-
It has been a while since I posted my progress on the upgrade. Things are moving along, just slowly. The last couple of weeks has been busy with work so I haven't been able to get as much done as I hoped. One of my biggest challenges has been trying to quiet down the drains to the sump. I tried several methods to silence the water as it falls in the sump. My wife had the final say as I tested the various methods to muffle the noise. Three times I got the look of "are you serious, that thing sounds like Niagara Falls" Finally thanks to this thread I came up with a solution. If you have the room, this device works awesome. I also built a manifold to feed the skimmer, CaRx, carbon, and phos-ban reactors. Other than some little miscellaneous tweaks I am calling the plumbing complete! Up next, I need to get the ReefKeeper II wired and pull electrical lines through the wall to control the return and CL pumps. I am also planning on putting the MH ballasts in the garage, so I need to run some lines for that as well.
End shot to show the muffler/bubble extractor...

Manifold

-
Nice build, I am also using the Hofer Gurgle Buster. I didnt see the hole drilled in the top of the cap with the 1/4 air tubing. Did you do this step? I have never seen it done without the airline tubbing.
The holes and airlines are there now. I just hadn't drilled them at the time of the picture. So far they are working nicely, very quiet. Currently I am fine tuning the plumbing with fresh water. The dual Hofers took a bit of finesse to get adjusted, but once I got them dialed in they are completely silent. Much better that the dursos on my current tank and they take up way less space. Anyone looking to use these are more than welcome to come check them out in action.
BTW, how is your build going?
-
Looks good! I like the fuge section section. Filling with water is the best part.
I wanted to make sure with this tank I took better advantage of the under stand space. When designing and building the sump I wanted to have an integrated fuge section. I am very happy with the way this came out. I am going to be building another sump for a friends 90 gallon build and am going to try and design something similar for his setup. Space is more of an issue, so we'll see if I can pull it off.
-
Just a quick update as it is late and I need to go to bed. I have been working hard on getting the tank ready for the water test. It is full of water and I am letting it run to work out the bugs in the system. Yesterday I filled it up and discovered one of the ball valves was bad and leaked through the shutoff. Of course it was the most difficult location to have to replace. The Hofer drain pipes took a while to dial in but are woking nicely now and are very quiet. I still need to tweak the drains to the sump cause there is a fair amount of noise there, but a little adjusting should fix that. Other than that everything is holding solid. I have some tweaks I need to make, but overall I am happy with the initial testing. I will shut up now and just show the pics...
OM 4-way

Pumps plumbed through the wall in the garage

Short clip of the sump in action


ckimble's 280g upgrade Blog
in Tank Builds
Posted
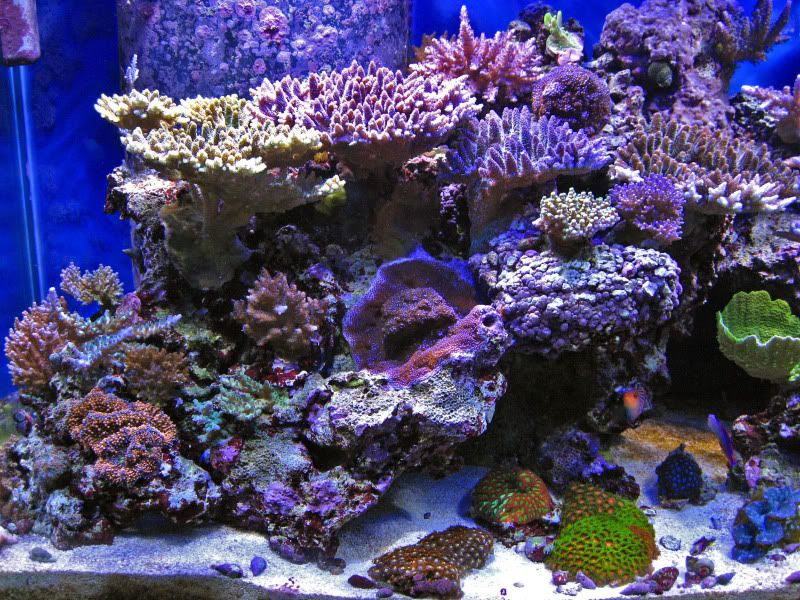
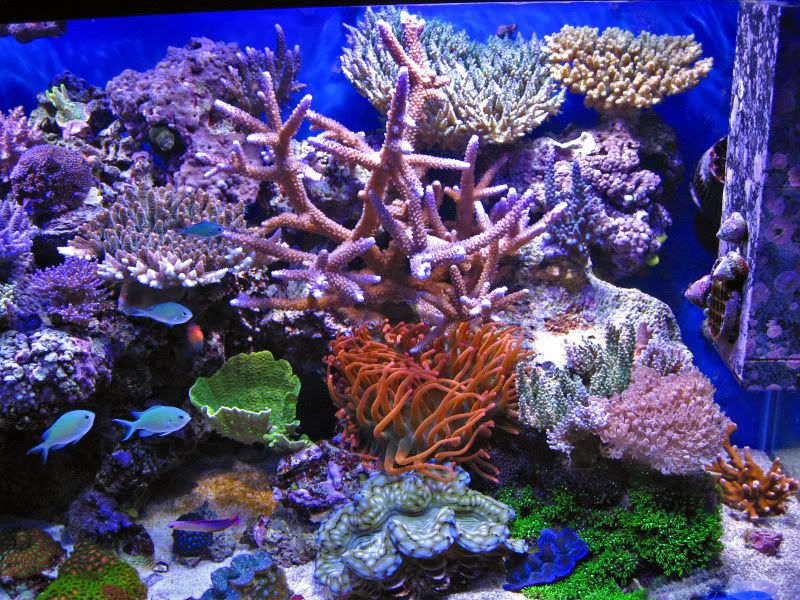
Last night I moved everything over. I spent about 6 hours getting everything transfered to the new tank. I pulled out all of the corals and placed them in holding bins with heaters. The next 3 hours I spent swearing at the tank trying to get the aquascaping just right. I still am not 100% happy, but it is good enough for now while I let everything settle in. The rest of the time was spent figuring out where to put the corals so things look balanced and somewhat natural. This will be an ongoing process, as I never really stopped tweaking it in the old 90g. I am mad at myself for not getting a picture of the 90 before I tore it down.
Before:
After:
Right:
Middle:
Left:
Let me know what you think, I am open to ideas...
If anyone is interested I have a huge rock (~8-10 inches) covered in GSP for sale. Plus, lots of frags I need to mount